
Fitting a new bathroom sink is a satisfying job, but it all hinges on getting the prep work right. Before you even think about the new basin, your focus should be on shutting off the water, getting the old unit out without any drama, and making sure you have every single tool and part you'll need.
Honestly, the difference between a project that goes smoothly and one that ends in a frantic trip to the DIY shop is all in the preparation.
Getting Ready: Your Toolkit and Takedown Plan
A successful installation is won or lost before you even touch a spanner. Good prep isn't just about clearing a space; it's about methodically setting yourself up for a leak-free, professional-looking finish.
I've seen it countless times – a well-organised toolkit is what separates a frustrating weekend battle from a job you can be proud of. It saves you scrambling for the right tool just when you're trying to tighten a fitting in a ridiculously awkward spot.
Gathering Your Tools and Materials
Before you start, do yourself a favour and lay everything out on an old dust sheet. It protects your floor and, more importantly, keeps every tool and fitting within arm's reach. There’s nothing worse than needing a specific spanner mid-task and having to hunt for it.
To give you a head start, I've put together a checklist of the essentials. This covers what you'll need for most standard sink installations here in the UK.
Your Complete Toolkit for Bathroom Sink Installation
| Item | Primary Use | Where to Buy in the UK |
|---|---|---|
| Adjustable Spanners (x2) | Gripping pipes and tightening compression fittings. Two lets you counter-rotate. | B&Q, Screwfix, Toolstation, local hardware shops |
| Basin Wrench | Reaching and tightening the tricky tap nuts tucked away behind the basin. | Screwfix, Wickes, most plumbing suppliers |
| Silicone Sealant & Gun | Creating a waterproof seal around the sink. Always use a mould-resistant type. | Any DIY store, like Homebase or B&Q |
| Bucket & Old Towels | Catching water from the trap and any drips from supply lines. Essential! | You probably already have these at home! |
| Utility Knife or Scraper | Cutting through the old, stubborn sealant to free the existing sink. | Wickes, Toolstation, or any major DIY retailer |
| Tape Measure | Ensuring the new sink fits and is centred correctly. | Available everywhere, from supermarkets to DIY stores |
| Spirit Level | Making sure the new sink is perfectly level. A wonky sink is a dead giveaway. | B&Q, Screwfix, local hardware shops |
This list covers the basics, but for a more comprehensive look at building a solid home toolkit, check out this guide on essential tools for homeowners.
Having the right gear on hand makes all the difference. Now, let's get that old sink out.
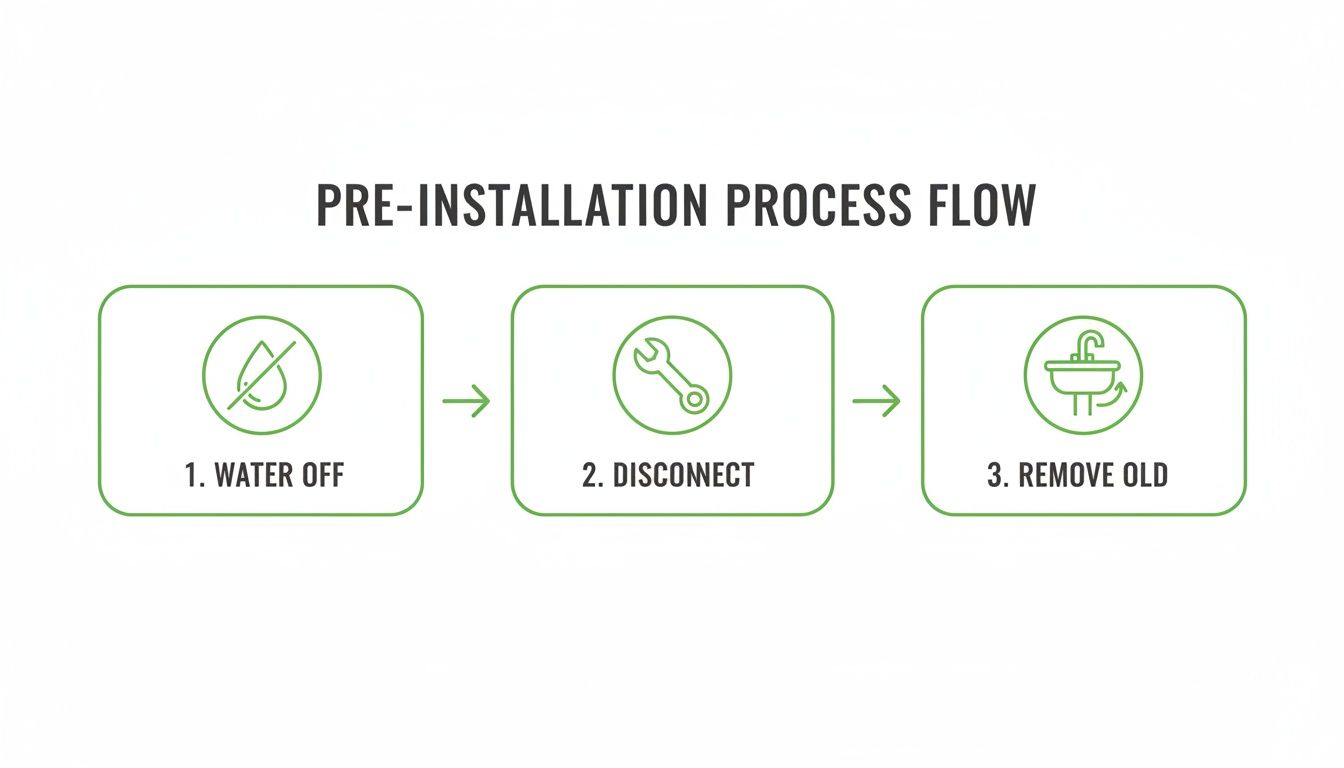
Safely Removing Your Old Sink
Taking out the old unit needs as much care as putting the new one in. You want to avoid chipping your worktop or scratching the floor. First things first: water off. Knowing how to turn off water mains safely is the most critical step. Get this wrong, and you've got a much bigger problem on your hands.
With the water off, open the taps to let any leftover water drain out. Now, grab your bucket and stick it directly under the U-bend (the trap) – it's full of water, and it will go everywhere if you're not ready for it. Loosen the large plastic nuts to disconnect it.
Next, you'll unscrew the flexible tap connectors from the isolation valves or pipework. Finally, find the fixings that hold the basin itself to the wall or the worktop and undo them.
A top tip from experience: Take photos on your phone of how the old plumbing is connected before you take it apart. This can be an incredibly useful reference when you start connecting the new waste and taps.
Once everything is disconnected, run your utility knife through the old silicone seal around the basin's edge and gently lift the old sink away. This is your golden opportunity to give the area a proper clean, scraping off any manky old sealant and grime. A clean, flat surface is absolutely vital for getting a perfect, watertight seal on your new sink.
Fitting Countertop Sinks: Inset and Undermount Styles
Countertop basins are a popular choice for a reason—they give a clean, built-in look that really elevates a modern bathroom. You’ll generally find two main types: inset (often called drop-in) and undermount. While both sit within the worktop, how you fit them is quite different, and each demands its own kind of precision.
An inset sink needs a neat, accurate cut, while an undermount relies on rock-solid support from below. Before you even think about cutting, though, the prep work is always the same.
Getting these basics right—water off, old plumbing disconnected, and the old unit out of the way—sets you up for a smooth and safe installation.
Mastering the Inset Sink Installation
Of the two, an inset sink is definitely the more straightforward to fit. It has a lip that rests on the worktop, which conveniently hides the cut edge. This gives you a bit more wiggle room if you're new to this, but getting it right still makes all the difference for a professional-looking finish.
Your first job is to make a precise template. Some sinks come with one, but I've always found it more reliable to make my own straight from the basin itself.
- Create Your Template: Flip the sink upside down on a big piece of cardboard and carefully trace around its outer edge.
- Mark the Cutting Line: Now, measure the width of the sink's lip—the bit that will actually sit on the worktop. Draw a second line inside your first outline, offsetting it by the width of that lip. This inner line is your guide for cutting.
- Position and Transfer: Cut out the cardboard template. Place it on the worktop, taking your time to get it perfectly centred and straight. Once you’re happy, trace around it with a pencil.
With your cutting line marked, you're ready to make the hole. Drill a pilot hole just inside the pencil line, big enough for a jigsaw blade. Using a fine-toothed blade (this helps prevent chipping the surface), slowly and carefully cut along your line. The principles for getting a clean cut in a bathroom worktop are identical to those for a kitchen, and you can find great advice on cutting kitchen worktops if you need more detailed tips.
Once the hole is cut, do a quick test fit. The sink should drop in snugly but without you having to force it. If it’s a bit tight, a file or some sandpaper is all you need to make small adjustments. Finally, run a continuous bead of mould-resistant silicone sealant around the top edge of the opening, then gently lower the sink into place. Be ready to clean away any excess silicone immediately with a sealant finishing tool for a tidy, waterproof seal.
Securing an Undermount Sink
Undermount sinks look fantastic, offering a seamless, high-end finish. But there's no sugar-coating it: they are much trickier to install. There’s no lip to hide your cut, so the opening needs to be flawless. Plus, the entire weight of the basin is supported from underneath by brackets and adhesive.
You'll start by making a template, just like with an inset sink. The big difference is that the cut edge will be visible, so it has to be perfect. Pros often use a router with a guide bearing for a super-smooth finish, which might be beyond a typical DIY setup. However, a carefully made jigsaw cut, followed by some patient and thorough sanding, can also produce a great result.
The real secret to a long-lasting undermount sink installation is robust support. Do not rely solely on silicone to hold the sink's weight. It will eventually fail. Those mounting clips included in the box are not optional—they do the heavy lifting.
After cutting and finishing the hole, it's time to attach the mounting brackets.
- Flip the worktop over and position the sink upside down on the underside, making sure it’s aligned perfectly with the opening.
- Mark the spots for the mounting clips around the edge of the sink.
- Drill pilot holes for the clip screws. Be incredibly careful here—you do not want to drill all the way through the worktop.
- Apply a generous bead of a strong, two-part epoxy adhesive to the rim of the sink.
- Carefully lift the sink into position and secure it by tightening the mounting clips.
The key is to work methodically, tightening each clip a little at a time to apply even pressure all around. This creates a solid, permanent bond. Once it's all secure, you can apply a neat bead of silicone sealant to the internal joint between the sink and the worktop for a final waterproof barrier.
Fitting Pedestal and Wall-Hung Basins
Pedestal and wall-hung basins are two of the most popular choices for UK bathrooms, but for very different reasons. One gives you that classic, timeless feel, while the other offers a clean, minimalist look that makes a room feel bigger. Despite their differences, they share one non-negotiable requirement: they both have to be securely fixed to the wall.
Unlike a basin that sits comfortably on a worktop, these types rely entirely on the wall for support. That’s where the installation method really matters. With a pedestal basin, the pedestal itself is mostly for show—it hides the pipework and offers some support, but it doesn't bear the full load. A wall-hung basin, on the other hand, puts all its weight squarely on its fixings. Get that wrong, and you’re in trouble.
The Right Way to Fit a Pedestal Basin
Here’s a classic DIY mistake I see all the time: people put the pedestal in place first and then try to drop the basin on top. It seems logical, but it’s a recipe for a wobbly, insecure fit. The secret is to think of the basin as a wall-hung unit to begin with, only bringing the pedestal in at the very end.
Your main job is to get that basin securely fastened to the wall at a comfortable height, which is usually somewhere between 800mm and 850mm from the finished floor to the rim of the basin.
-
Get Your Marks: Pop the pedestal roughly where you want it and rest the basin on top. Grab your spirit level, make sure the basin is perfectly horizontal, and then carefully mark the fixing holes on the wall with a pencil.
-
Drill and Prep: Now, move the basin and pedestal out of the way. Drill the holes you’ve just marked. You'll need to use the right wall plugs for your wall type—heavy-duty ones for brick or block, and specialist plasterboard fixings if you're going into a stud wall. Screw in your fixing bolts, but leave them sticking out just enough to hang the basin on.
-
Mount the Basin: Carefully lift the basin and hang it on the bolts. Double-check it’s still level before you tighten the nuts from underneath. You want it firm against the wall, with no movement.
Only after the basin is completely secure should you slide the pedestal into position underneath. It should fit snugly, taking a bit of the strain and neatly concealing the trap and pipes. To finish it off, run a clean bead of silicone sealant along the back edge where the basin meets the wall.
Securing a Floating Wall-Hung Basin
Wall-hung, or 'floating', basins are fantastic for creating a sense of space, but they demand some serious thought about how they’re mounted. The wall has to be strong enough to handle the entire weight of the basin, plus the extra load of someone leaning on it. This is absolutely not a job for standard plasterboard plugs.
Success here is all about finding a solid anchor point.
The golden rule for any wall-hung fixture, from basins to toilets, is simple: fix into something solid. This means finding the timber wall studs or, even better, fitting what’s known in the trade as 'pattressing'—a piece of timber or plywood fixed horizontally between the studs specifically to give you something strong to bolt into.
You’ll need to use the heavy-duty bolts that came with the basin, often called frame fixings or Fischer bolts. These are designed to go deep into the structural part of the wall, not just the plasterboard.
It's worth noting that with the average UK bathroom renovation now costing around £6,500, getting the installation right yourself can be a big money-saver. A plumber might charge £120 to fit a simple pedestal basin, but that cost can jump to over £250 for a wall-mounted one because of the extra work needed to ensure the wall is strong enough. You can find more details on UK bathroom renovation costs on bathroommountain.co.uk.
This makes getting the installation right the first time absolutely crucial.
Common Pitfalls and How to Avoid Them
Knowing the right steps is one thing, but knowing what can go wrong is just as important. Here are a few common slip-ups people make.
- Ignoring the Wall Type: This is the quickest way to have your basin end up on the floor. Using the wrong fixings is a disaster waiting to happen. A stud finder is a cheap and invaluable tool for tracking down timber supports.
- Over-tightening Fixings: It’s easy to think tighter is better, but you can easily crack a ceramic basin by cranking down on the nuts too hard. The trick is to tighten until the basin feels solid and doesn't budge, and then stop.
- Measuring from the Wrong Place: Always, always measure from the finished floor level. If your flooring isn't down yet, don't forget to add its thickness to your calculations when you mark the height for the basin.
- Forgetting to Level: A wonky basin looks awful and can even stop water from draining properly. Use your spirit level at every key stage—when you mark the wall, when you hang the basin, and just before that final tighten.
If you focus on getting the basin securely and levelly attached to the wall first, you’re well on your way to a professional-looking job that will be safe and solid for years.
Connecting Taps, Waste, and Traps
With your basin solidly in place, it's time to bring it to life by connecting the plumbing. This is where you’ll hook up the taps, the waste fitting in the plughole, and the trap that connects it all to the drain. It might look complicated, but if you tackle it methodically, you'll have a leak-free setup in no time.
We'll work from the top down: taps first, then the waste, and finally, the trap underneath.
Fitting Your Taps and Supply Lines
Here's a tip that will save your back and sanity: always fit the taps to the basin before you mount it. Trying to tighten nuts in a tiny space under an installed sink is a nightmare. Doing it beforehand gives you all the room you need.
The process is pretty much the same whether you're fitting a single monobloc mixer tap or separate hot and cold pillar taps. Just feed the flexible tap tails through the hole (or holes) from the top. Then, from underneath the basin, slide on the washer and thread on the retaining nut.
A basin wrench is your best friend here. It’s designed specifically to reach up into that awkward space and get a good grip on the nut. Tighten it until the tap feels solid and doesn't spin, but don't go overboard—you don't want to crack the ceramic.
Installing the Basin Waste
Now for the waste. The single most important decision you'll make here is choosing between a slotted or unslotted waste. This isn't a style choice; it’s a functional one determined entirely by your basin.
- Slotted Waste: Your basin has a small hole near the top rim called an overflow. You must use a slotted waste to allow water from that overflow to drain away.
- Unslotted Waste: If your basin has no overflow, you need an unslotted waste. It's a completely sealed unit.
Get this wrong, and you're practically guaranteed a leak under the sink.
To fit the waste, you need to create a perfect seal. The traditional method is to use plumber's putty. Just roll a small sausage of it, press it onto the underside of the waste's flange, and drop it into the plughole. Modern waste kits often come with well-designed silicone or rubber washers that do the job just as well, so check what's included.
Once the waste is in place, add the washer from underneath and tighten the back nut. If you used putty, the excess will squeeze out; simply trim it away for a clean finish.
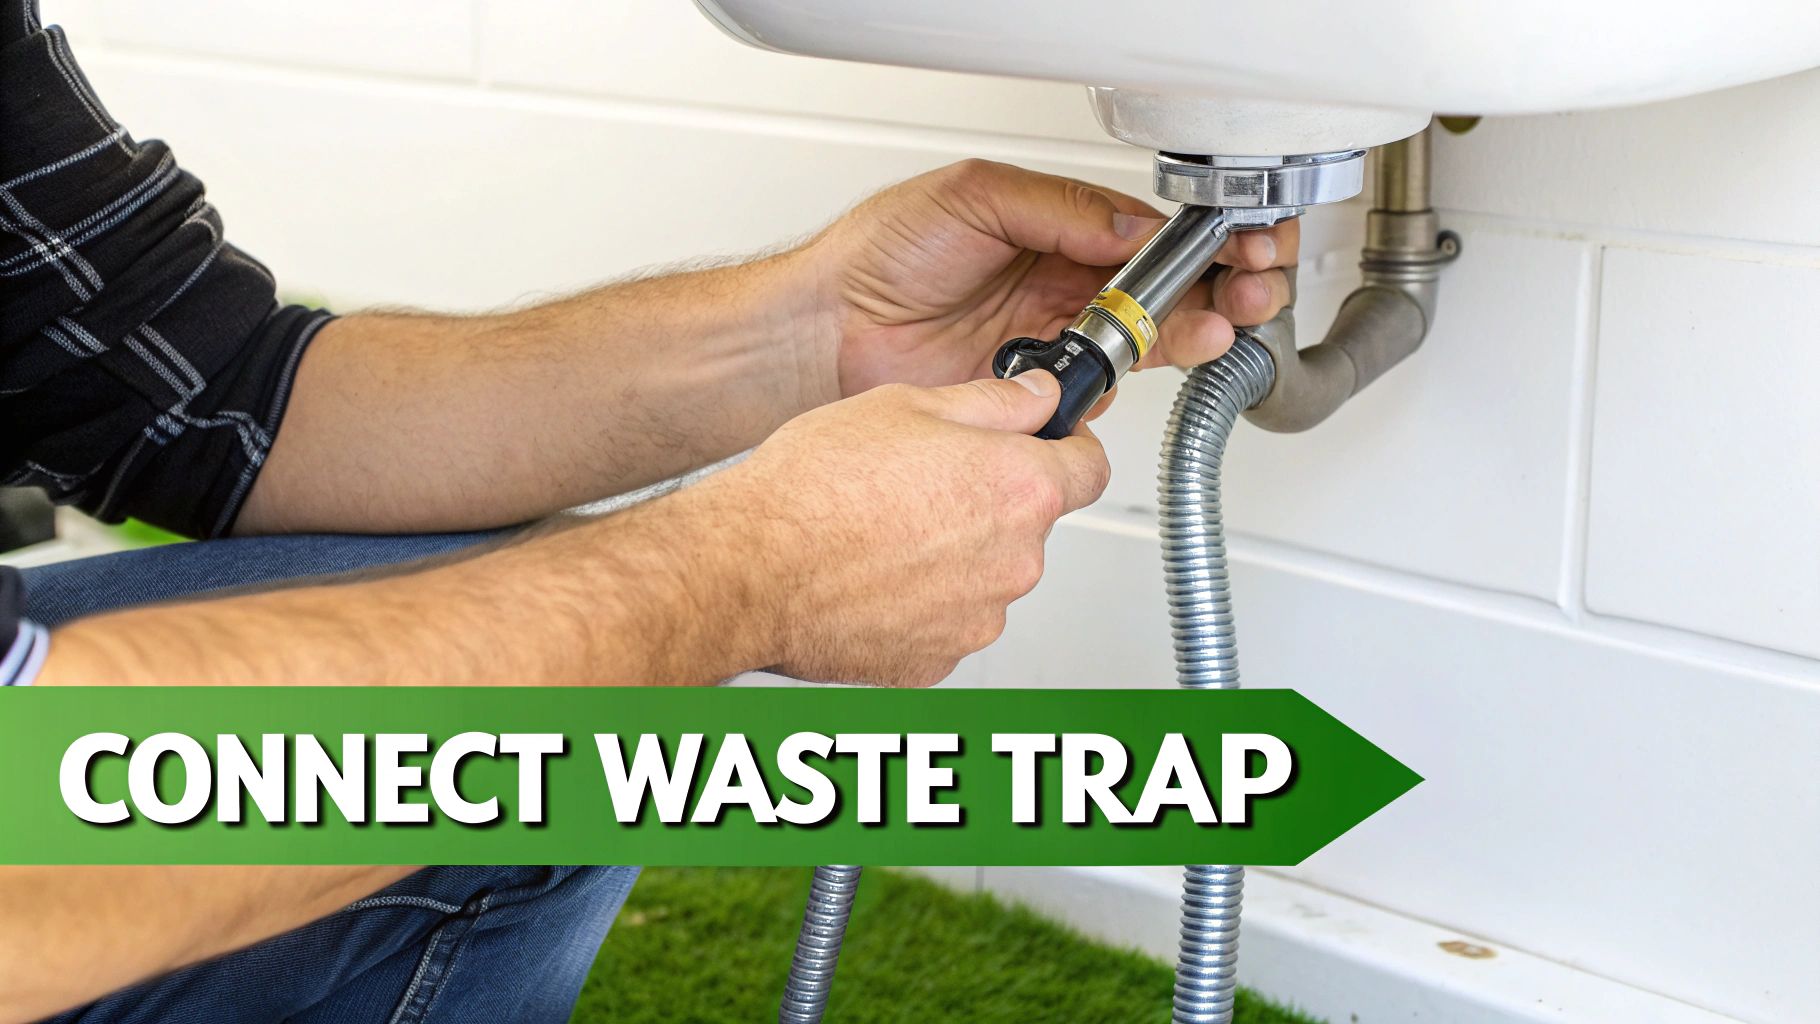
Assembling and Connecting the Trap
The final piece of the puzzle is the trap. This is the U-shaped or bottle-shaped pipe that connects the waste to the main drain pipe coming out of the wall. Its clever bend holds a small amount of water, which acts as a barrier to stop nasty sewer smells from wafting up into your bathroom.
You'll typically see either P-traps or bottle traps. If your pipework is going to be exposed, like with a wall-hung basin, a stylish chrome bottle trap looks much better. A great, reliable option that we see professionals use all the time is the McAlpine A10 Bottle Trap with a 75mm Seal.
Assembling the trap is usually straightforward—just make sure all the rubber seals are seated correctly before hand-tightening the compression fittings. First, connect the trap's top opening to the threaded tail of your basin waste.
The trickiest part is often getting the horizontal pipe to the right length. You'll almost certainly need to cut it to meet the waste pipe in the wall. Remember the old saying: measure twice, cut once! A small hacksaw will give you a clean cut. Afterwards, use a file to lightly chamfer the cut edge. This removes any burrs and helps it slide smoothly into the wall fitting.
A Pro Tip for a Perfect Seal: When tightening the plastic compression fittings on a trap, tighten them by hand until they feel snug. Then, give them just one extra quarter-turn with a wrench or grips. Any more, and you risk stripping the threads or cracking the plastic.
While a DIY sink installation is a great way to save money, it's helpful to know what the pros charge. A straightforward vanity unit fitting might cost £100-£300. This is often just one element of a small bathroom renovation, which can range from £1,600-£4,600. By doing the work yourself, you're pocketing that labour cost.
However, if your project involves moving existing plumbing, that could add £200-£800 to the bill. This is an important consideration, as around 20% of UK construction is for new private housing that requires entirely new plumbing installations. Always make sure your work adheres to Part G of the Building Regulations covering water safety. For more data on the industry, you can check out the UK bath fitting market report on mordorintelligence.com.
Final Sealing and Leak-Testing Your Work
You're on the home straight now. The basin is secure, the plumbing is connected, and the finish line is in sight. This final stage is all about creating those watertight seals and methodically checking your work to guarantee a leak-free finish. Taking your time here is what separates a job well done from a frustrating callback for a drip you missed later on.
First up is applying a clean, professional-looking seal around the edges of the basin. This isn't just for aesthetics; it's a critical barrier against water getting where it shouldn't, which can lead to damaged worktops and nasty mould growth. In fact, a recent survey found that a staggering 78% of common household leaks start in the bathroom or kitchen, which really drives home how important this final seal is.
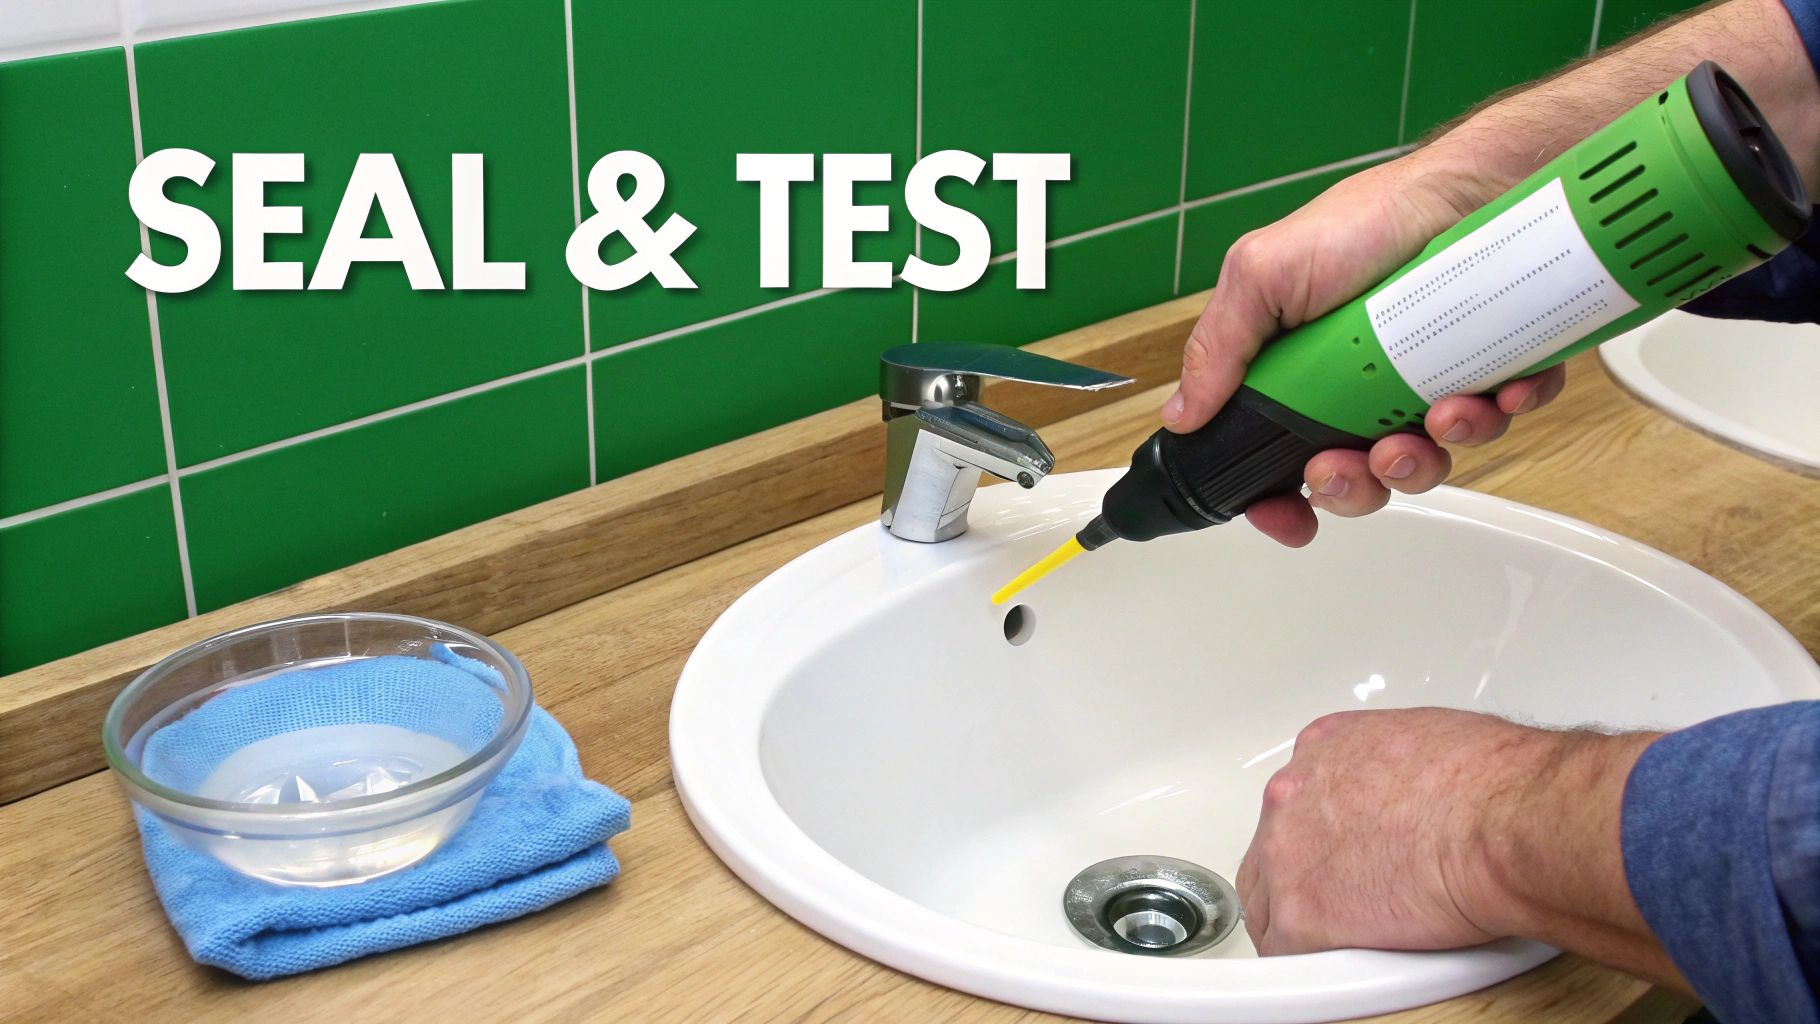
Applying a Professional Silicone Seal
For that crisp, clean finish, you need a good quality, mould-resistant sanitary silicone sealant. The real trick to getting a smooth, even bead comes down to consistent pressure and speed.
- Prep is everything. Before you even think about picking up the sealant gun, make sure the gap where the sink meets the wall or worktop is completely clean, bone dry, and free of any dust or grease.
- Cut the nozzle right. Snip the end of the silicone tube's nozzle at a 45-degree angle. The size of the hole should roughly match the gap you’re filling—it’s always better to start small, as you can easily trim it again if needed.
- Apply with confidence. Place the nozzle right into the corner. Applying steady, even pressure on the gun's trigger, move smoothly along the joint. Your goal is to do each side in one continuous motion.
- Smooth the bead. As soon as you've applied the sealant, use a finishing tool or a wet finger dipped in soapy water to smooth the bead down. This simple action presses the silicone firmly into the gap and wipes away any excess, leaving you with a perfect line.
For a completely watertight installation and a truly professional finish, knowing the pro techniques for caulking large gaps is a massive help at this stage. Once it’s on, you have to let the silicone cure. It might feel dry to the touch in an hour, but it needs a full 24 hours to become completely waterproof. Don't be tempted to use the sink before then!
The All-Important Leak Test
With the sealant fully cured, it’s the moment of truth. Turning the water back on should be a slow, deliberate process, not a sudden flood.
Turn the mains stopcock back on slowly, just a quarter-turn to begin with. This gradual approach minimises the risk of a high-pressure "water hammer" effect shocking your new joints and gives you a moment to spot any major gushers immediately.
Listen for any hissing sounds and give the isolation valves and tap connectors a quick visual check first. If everything looks dry, you can open the stopcock fully. Now, it's time to systematically work your way through every single connection point.
Leak-Testing Checklist
- Tap Connectors: With dry hands or a piece of kitchen roll, feel around the nuts connecting the flexible tails to the isolation valves. Even the tiniest bead of moisture will show up on the paper.
- Basin Waste: Fill the sink with a few inches of cold water and have a good look underneath where the waste flange meets the basin.
- Trap Joints: Pull the plug and let the water drain out in one go. This rush of water will put the trap's compression fittings under real pressure. Check every single joint for drips.
- Overflow Channel: If your sink has an overflow, keep filling it until water starts running down the overflow channel. Check the slotted waste connection carefully for any signs of escaping moisture.
Don't forget to run the hot tap for a minute, too. Sometimes, the thermal expansion from the hot water can reveal tiny leaks that weren't apparent with just cold water.
Troubleshooting Common Snags
Even when you're careful, small issues can pop up. The key is to tackle them quickly and calmly.
- A tiny drip from a compression fitting? Nine times out of ten, this just needs a gentle tweak. Give the plastic nut another quarter-turn with your grips. Don't go overboard and crack the plastic.
- Water seeping from under the plughole? If you spot a drip from under the waste flange inside the cabinet, the back nut underneath probably needs tightening a little more to compress its seal.
- Slow draining? This usually points to an obstruction or a problem with the pipe alignment. Double-check that the horizontal waste pipe has a slight, continuous downward slope towards the wall and isn't angled upwards at any point.
Addressing these minor snags right away ensures all your hard work results in a reliable, fully functional, and professional-looking new bathroom sink.
Your Questions Answered
Even with the best instructions, a few questions always pop up when you're in the middle of a job. Let's tackle some of the most common ones we hear about fitting a new bathroom basin, so you can get the job done right.
Do I Really Need to Hire a Plumber to Fit a New Basin?
Honestly, it depends on the job. If you're just swapping out an old sink for a new one in the same spot—what we call a like-for-like replacement—a confident DIYer can absolutely handle it. You’ll save a good bit on labour and learn a lot along the way.
However, the moment you start thinking about moving pipework or shifting the sink to a new wall, it's time to call in a professional. A qualified plumber is your best bet to ensure everything meets the strict UK Water Regulations and to avoid any costly mistakes.
Slotted vs. Unslotted Waste: What's the Difference?
This one catches so many people out, but it's really simple. It all comes down to whether your basin has an overflow—that little hole near the top of the bowl that stops it from flooding if you leave the tap running.
- Slotted Waste: Got an overflow? You must use a slotted waste. It has a small slot in the side that allows water from the overflow to drain away properly.
- Unslotted Waste: No overflow? You'll need an unslotted waste, which is a solid, sealed unit.
Getting this wrong is a classic DIY blunder. If you fit an unslotted waste to a basin with an overflow, any water that goes into the overflow channel will just pour straight into your vanity unit. It’s a guaranteed leak.
How Long Before I Can Use the Sink After Sealing It?
I know it's tempting to test out your new basin straight away, but you have to be patient with silicone. It might feel dry to the touch within an hour, but it’s not properly cured.
As a rule of thumb, give it a full 24 hours before you let any water near it. This gives the sealant enough time to cure completely, making it fully waterproof and durable. Always check the instructions on the tube, though, as things like temperature and humidity can affect the exact time.
What's the Standard Height for a Bathroom Sink in the UK?
In the UK, the top rim of a basin is usually set between 800mm and 850mm from the finished floor. This height works comfortably for most adults.
Of course, the great thing about wall-hung basins is that you're not stuck with that standard. You have the freedom to set it at a height that’s perfect for you and your family, which is especially handy if you have specific accessibility needs.
For all the tools, materials, and expert advice you need to complete your project, visit Burnt Oak Builders Merchants. Find everything from taps and traps to sealants and spanners at https://www.burntoaktimber.com.