
So, you're staring at some old, shiny gloss paint and wondering if you can just paint straight over it. The short answer? Yes, you absolutely can. But—and this is a big but—you can't just slap a new coat on and hope for the best.
That glossy surface is your enemy. It's slick, non-porous, and gives new paint absolutely nothing to grab onto. Trying to paint directly onto it is a guaranteed recipe for drips, chips, and peeling paint down the line. The real secret to a beautiful, long-lasting finish lies in the prep work. Get that right, and the rest is easy.
Why Preparation Is Everything When Painting Over Gloss
Think about that old gloss-painted door, window frame, or skirting board. Over the years, it's become incredibly smooth and sealed. Modern paints, especially the water-based ones most of us use today, will just slide around on that surface.
This is where so many DIY projects go wrong. People get excited about the new colour and skip the boring-but-essential first steps. Your goal isn't to strip the old gloss paint off completely. Instead, you just need to create what's known in the trade as a 'key'. This simply means giving the surface a slightly rough, textured finish that the new primer and paint can lock onto.
The Two Pillars of Gloss Preparation
To get a finish that looks professional and actually lasts, you need to focus on two non-negotiable steps.
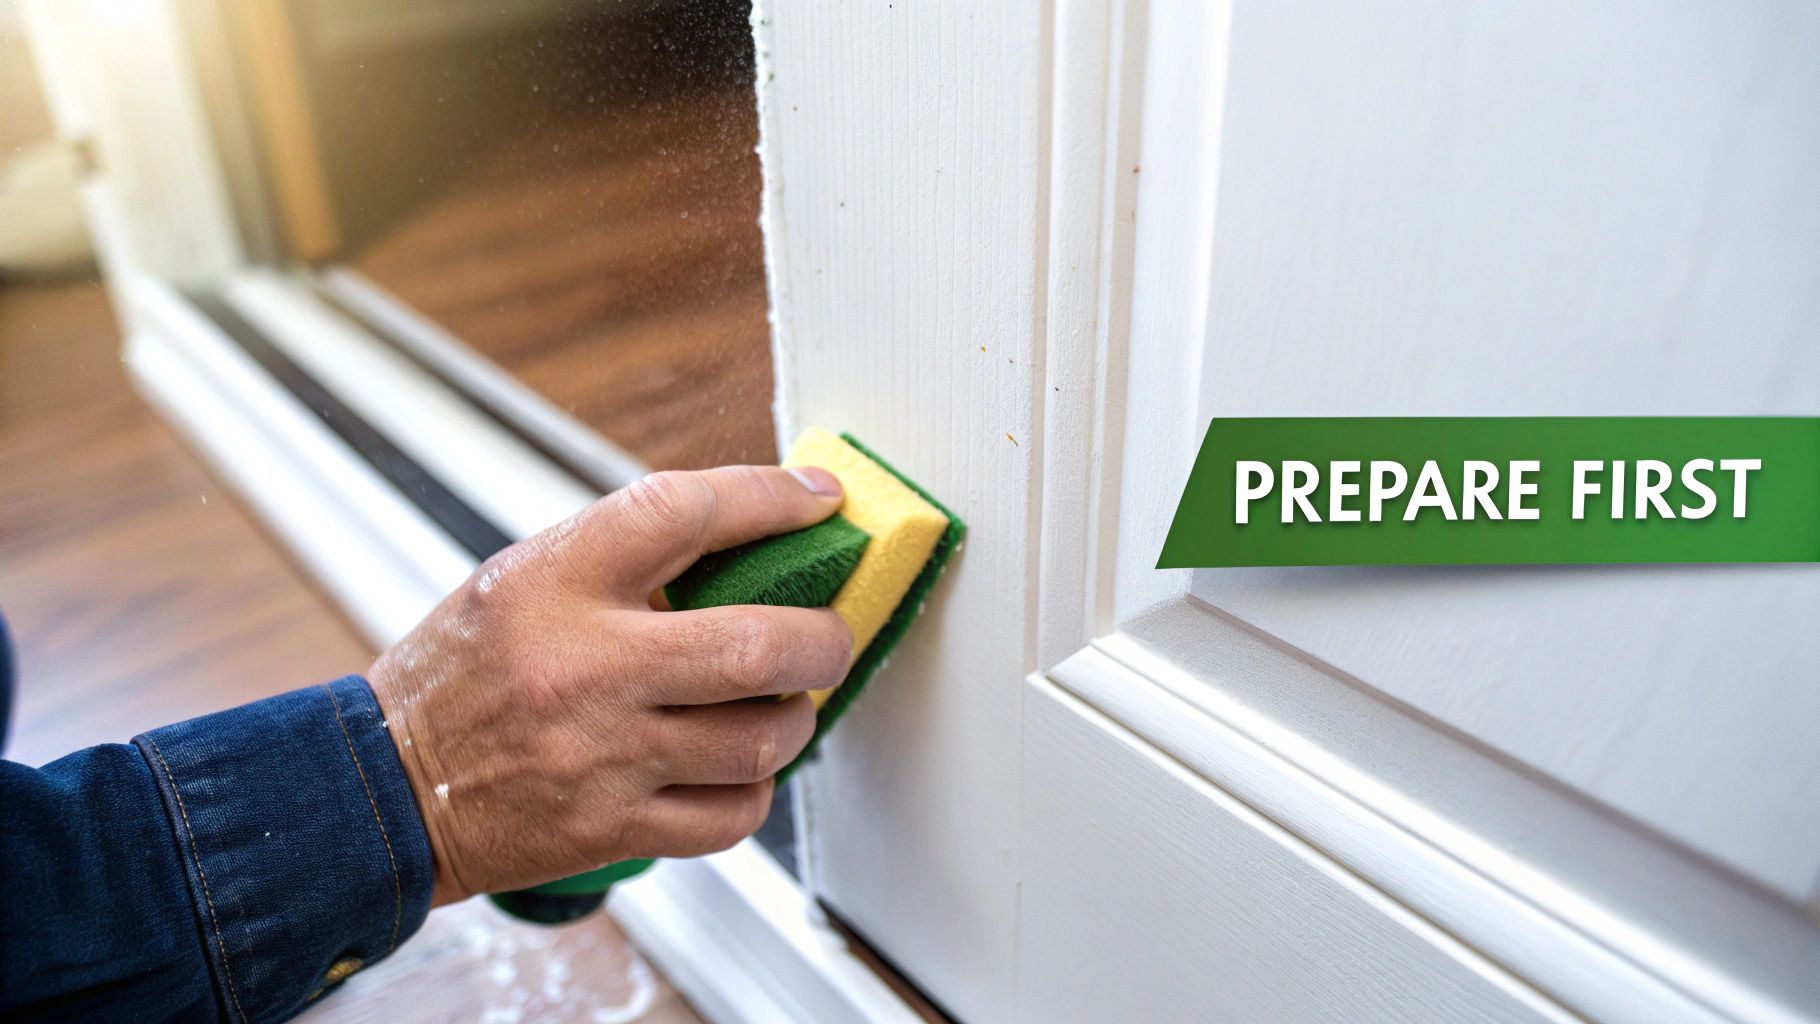
- A Proper Clean: Every surface, no matter how clean it looks, has a film of grease, dust, and old cleaning residues. This invisible layer will ruin your paint job. You need to give it a good scrub with something like sugar soap to get it properly clean.
- A Quick Sand: Once it's clean and dry, it's time to break that shine. A light scuffing with sandpaper is all it takes. This creates thousands of tiny scratches that act as anchors for your new paint. It's the most critical part of the process.
The biggest mistake I see is people thinking a high-end, expensive paint will make up for lazy prep. It won't. When you're painting over gloss, the prep work is honestly more important than the paint you choose. Nail the prep, and you're halfway there.
Once you know how to handle gloss, you can transform almost anything in your home. This knowledge is perfect for updating tired woodwork and is behind many of the best tips for upcycling furniture, too. It's also worth figuring out if your existing gloss is oil-based or water-based, as that can affect your choice of primer and topcoat. With a bit of planning, what seems like a tricky job becomes a satisfying and straightforward project.
Gathering Your Essential Toolkit
Walking into a project with the right gear can be the difference between a job you’re proud of and one that’s just a frustrating mess. Before you even think about cracking open that tin of paint, let’s get your toolkit sorted. It’ll save you a dozen trips to the DIY shop and help you get that professional-looking finish we’re all after.
Think of it this way: a great paint job is all about the prep. Your first port of call should be sugar soap. Honestly, don't skip this. It's a fantastic degreaser that blitzes through the grime, grease, and years of furniture polish that can stop your new paint from sticking properly. Grab a couple of good microfibre cloths to go with it; they’re brilliant for trapping every last bit of dust.
Sanding and Safety Gear
With the surface clean, you need to give the new paint something to grab onto. This is where sanding comes in. For most interior gloss surfaces—think doors, skirting boards, or window frames—a medium-grit sandpaper is perfect. I usually reach for a 120-grit paper. It’s got just enough bite to rough up that shiny surface without gouging the wood underneath.
And please, always have a good quality dust mask handy. You really don’t want to be breathing in those fine particles, especially if you’re working with older paint which could potentially contain lead.
Remember, the goal of sanding isn't to strip the paint back to bare wood. You're simply aiming to dull the shine and create a matt surface that new paint can tenaciously grip onto.
Primers for Different Problems
Choosing the right primer is where you can really set your project up for success. It’s not a one-size-fits-all situation; the primer you need depends entirely on what you're painting over.
-
High-Adhesion Primer: This is your go-to for most sound, previously painted gloss surfaces. It's specifically made to stick to slick, difficult surfaces like a magnet.
-
Stain-Blocking Primer: If you’re dealing with old oil-based gloss that has yellowed over time, this is an absolute must. It creates a solid barrier to stop that yellowing from bleeding through and ruining your lovely new top coat.
If you're building up your general DIY kit, our guide on the essential tools for homeowners has a great rundown of what you’ll need for all sorts of jobs around the house.
Brushes, Rollers and Finishers
Finally, let's talk about the tools that actually put the paint on the wall. The quality of your finish is directly tied to the quality of your applicators.
For modern water-based gloss or satinwood paints, a good synthetic-bristle brush is your best friend. They don't absorb water like natural bristles, so they won't go limp and floppy halfway through the job. For bigger, flatter areas like doors, a mini foam roller is a game-changer. It can lay down a beautifully smooth, almost spray-like finish with very little texture. Having both on hand gives you the flexibility to tackle any part of the job with real confidence.
Mastering the Prep Work: Cleaning and Sanding
A flawless paint job is all about what you do before you even open the tin of paint. Get the prep work right, and you’re 90% of the way there. If you cut corners here, I can guarantee that even the poshest paint will let you down. So, let’s get into the nitty-gritty of doing it properly.
First things first: cleaning. I don't just mean a quick wipe with a damp rag. We need to get serious about degreasing. Over the years, surfaces like skirting boards, doors, and especially kitchen units build up a fine layer of grease, grime, and old cleaning residues. You can't always see it, but it’s the number one enemy of good paint adhesion.
To get rid of that film, you need a proper cleaning solution. This is where sugar soap is worth its weight in gold. Mix it up according to the instructions and give every inch of that gloss surface a good, honest scrub. Once you're done, rinse it all off with fresh, clean water and let it dry completely. For a closer look at the right stuff for the job, have a browse through our range of specialist preparation and cleaning solutions.
Creating the Perfect "Key" with Sanding
Right, once the surface is clean and bone dry, we move on to the most crucial step of all: sanding. The aim here isn't to strip the old paint back to bare wood. Not at all. What you're doing is abrading the surface—knocking back the sheen and creating thousands of tiny scratches for the new paint to bite into.
We call this "creating a key," and it gives your primer something to physically grab onto, forming a bond that’ll last for years. If you skip this, your new coat of paint is just sitting on a slippery, glossy surface, waiting for the first knock to chip or peel right off.
For big, flat areas like doors, an electric sander with a medium-grit paper (around 120-grit) will save you a world of time and elbow grease. But for fiddly bits like architraves or detailed mouldings, you’ll have to get in there by hand. I find a flexible sanding pad, or just sandpaper wrapped around an old sponge, works a treat for getting into all those curves and corners.
This little infographic sums up the basic workflow perfectly. It’s all about the prep.
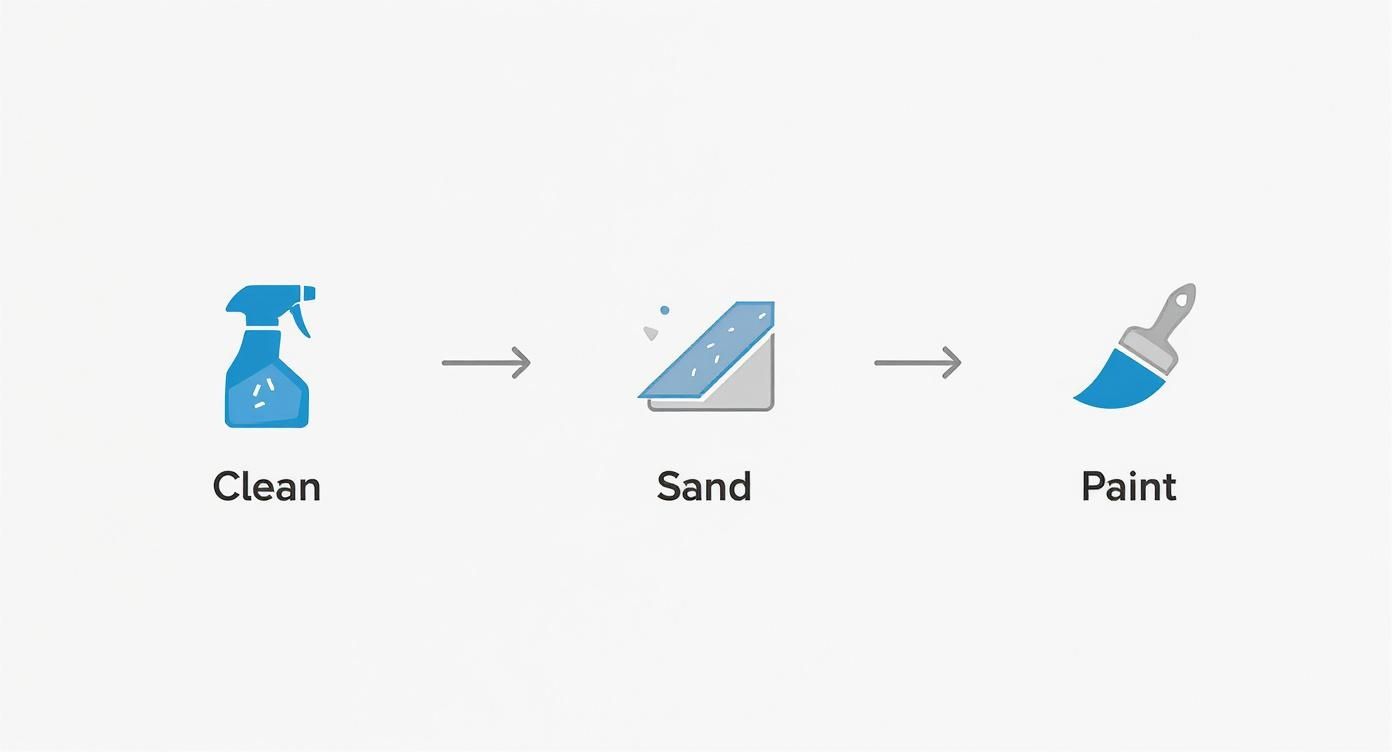
As you can see, painting is the final, and often quickest, part of the job. It's the groundwork that makes all the difference.
What About Chemical Deglossers?
If the idea of sanding fills you with dread (and thoughts of dust everywhere), you might have seen "liquid sander" or chemical deglosser products on the shelves. These work by chemically softening the top layer of the gloss, making it tacky so the new paint can stick.
My Two Cents: Chemical deglossers can be handy in a pinch, especially in well-ventilated rooms or for really intricate surfaces that are a nightmare to sand. But for the most reliable, long-lasting finish, particularly on high-traffic areas, you really can't beat a good old-fashioned light sanding. It's the gold standard for a reason.
They're certainly an option, but they have their downsides. The fumes can be pretty potent, so you'll need plenty of fresh air. From my experience, the results can sometimes be less consistent than you get with mechanical sanding. It really comes down to the specific job and what you're comfortable using.
Choosing the Right Primer for Lasting Results
With a clean, keyed surface ready to go, the next choice you make is the most important one for a lasting finish. Picking the right primer isn't just an extra step; it's the critical bridge between the old, slick gloss and your brand-new topcoat. Get this wrong, and all that prep work could be for nothing.
First, let’s clear up a common point of confusion. A primer is all about adhesion—its main job is to stick stubbornly to tricky surfaces. An undercoat, on the other hand, is about building colour and creating a solid, even base for your final coat.
When painting over gloss, you’ll often find combined primer-undercoats. These are usually the best choice as they do both jobs in one, saving you time and effort.
Oil-Based vs Water-Based Primers
The big debate often comes down to traditional oil-based primers versus their modern water-based (acrylic) cousins. Each has its place, but for most interior DIY projects today, water-based formulas are winning out for good reason.
-
Oil-Based Primers: They offer phenomenal grip and are fantastic at blocking stubborn stains, like the yellowing from old oil-based gloss. The trade-off? They come with strong fumes, require white spirit for clean-up, and have much longer drying times.
-
Water-Based Primers: Modern acrylic primers have improved massively over the years. They provide excellent adhesion, have very low odour, dry quickly (often ready for a topcoat in just a few hours), and clean up easily with plain water.
This shift isn't just a trend; it's an industry-wide move. Driven by safety and environmental regulations, water-based technology now accounts for 87.28% of the UK architectural coatings market volume. So, when you reach for a water-based primer, you're using what the pros are using.
Matching the Primer to the Project
So, which tin should you grab from the shelf? Your decision really depends on the job at hand.
Let's say you're painting over old, yellowed gloss skirting boards with a crisp white satinwood. In this case, a stain-blocking primer is non-negotiable. It creates an impenetrable barrier that stops the discolouration from bleeding through and ruining your pristine finish.
What if you're making a dramatic colour change, like painting a dark navy gloss door a pale grey? You'll need a high-adhesion primer with excellent opacity. This will obliterate the old dark colour, meaning you'll need fewer topcoats to get a solid, even result—saving you both time and paint.
If you'd like to dive deeper into this essential step, you can explore more about what is primer paint used for and see how versatile it really is.
A good primer doesn’t just help the paint stick; it makes the entire job easier. It improves the flow of your topcoat, enhances the final colour, and provides a much more durable, professional-looking finish that will stand the test of time.
Applying Your Top Coat Like a Pro
Right, this is the moment all that prep work pays off. You’ve put in the effort cleaning, sanding, and priming, and now you’re ready for the final colour that will bring the whole project to life.
What paint you choose for the top coat is mostly down to personal taste and what the surface will have to put up with. Modern water-based satinwood and gloss paints are incredibly popular these days, and for good reason. They’re low-odour, dry quickly, and—crucially—they won't yellow over time like old-school oil-based paints.
That’s not to say oil-based paints are obsolete. They still offer a rock-hard, exceptionally durable finish. But their long drying times and strong fumes just aren't practical for most interior jobs anymore. For your average skirting boards, doors, and trim, a quality water-based paint is almost always the better choice.
Nailing the Application Technique
To get that coveted professional finish, your technique is just as important as your prep.
Start by 'cutting in'. This is just the painter's term for carefully painting the edges where your woodwork meets the wall. A good quality angled brush and a steady hand are your best friends here; this is what creates those satisfyingly crisp, clean lines.
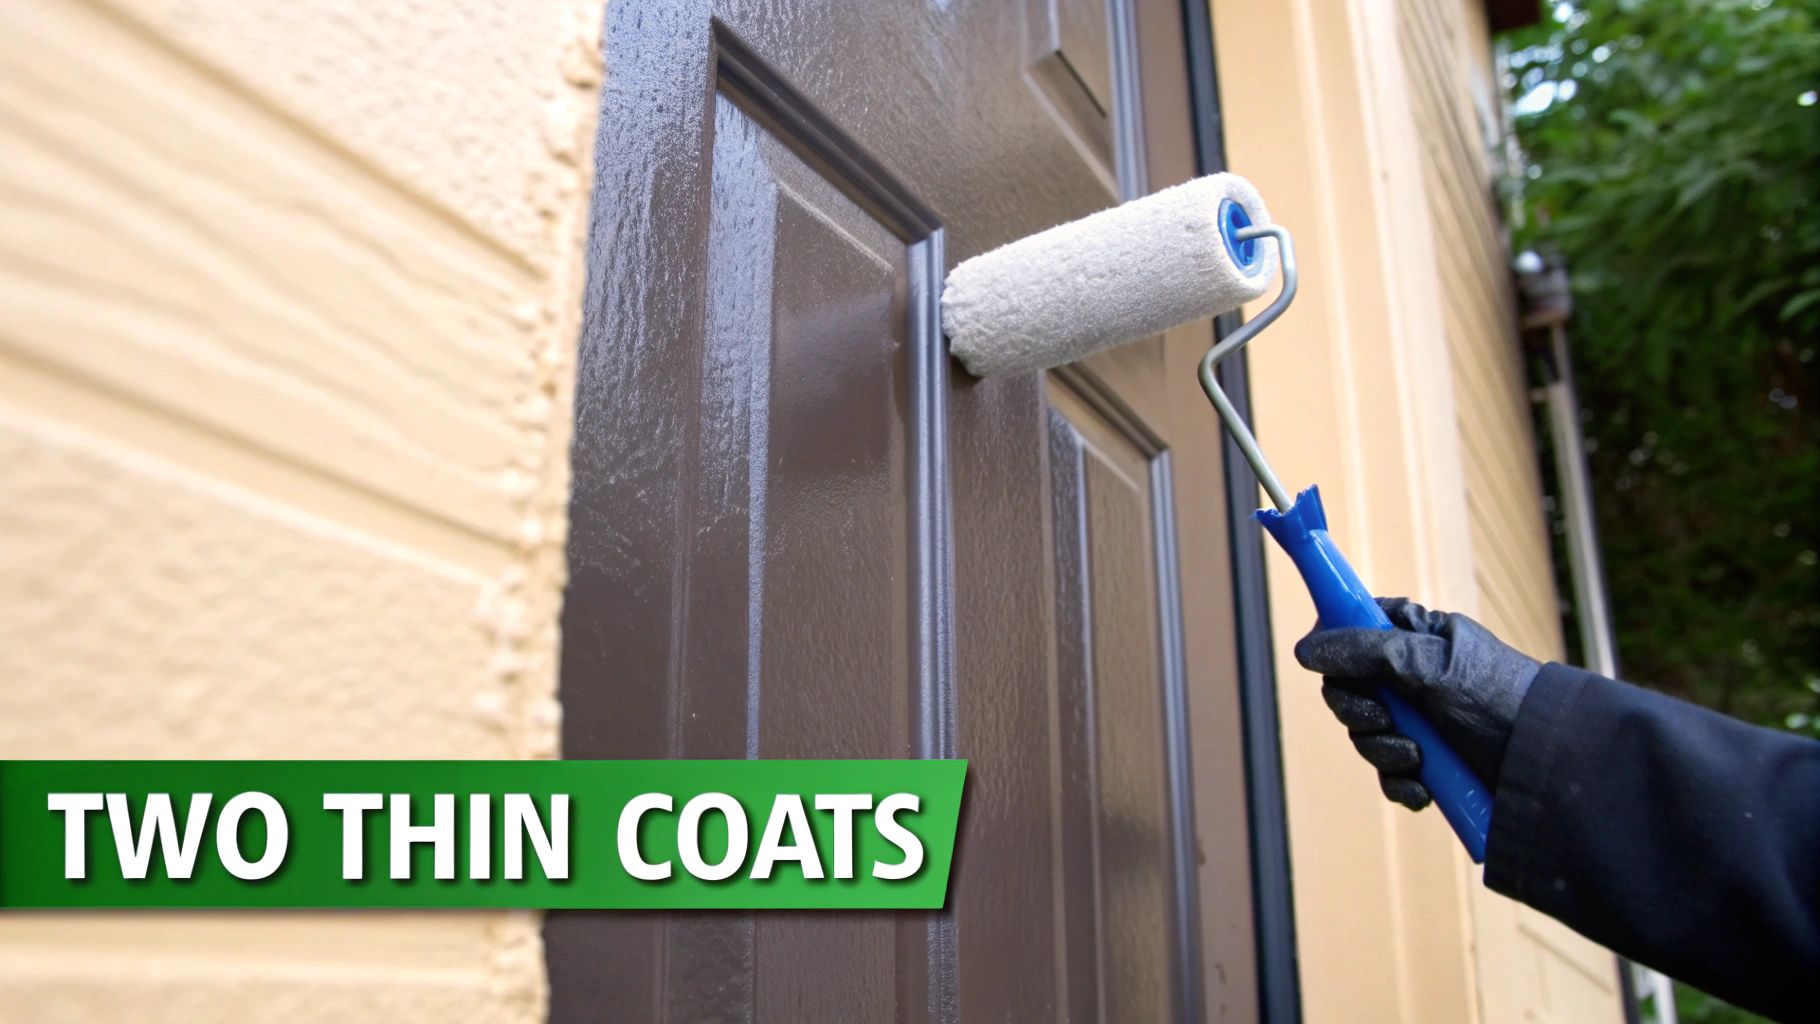
Once the edges are done, switch to a mini foam or microfibre roller for the larger flat bits, like door panels. This gets the paint on quickly and evenly, giving you a beautiful, smooth finish with barely any texture.
The golden rule I always follow is to apply two thin coats instead of trying to get it done in one thick one. A thick coat takes forever to cure properly, is far more likely to drip and run, and just won't be as tough in the long run. Two thin coats will give you a much stronger, smoother finish that lasts.
Troubleshooting Common Mishaps
Even when you've done everything right, little issues can crop up. Don't worry, most are an easy fix if you catch them early.
- Brush Strokes: Seeing visible brush marks? You might be overworking the paint or letting your brush get too dry. Make sure you load your brush properly (about a third of the way up the bristles) and use long, confident strokes. If they still show up after it's dry, a quick, light sand with very fine 320-grit sandpaper between coats will knock them flat.
- Bubbles: If you spot tiny bubbles, it's usually because the paint tin was shaken too hard or you're rolling a bit too fast. The best thing to do is just let it dry completely, lightly sand the area smooth, and then apply your next coat a bit more gently.
These are fundamental techniques for any woodwork project. For a more detailed walkthrough, our guide to painting a front door has specific tips you can easily apply to other jobs around the house. A bit of patience is all it takes to get a flawless result.
Common Questions About Painting Over Gloss
Even the most seasoned DIYer runs into questions now and then, and when it comes to gloss paint, a few crop up time and again. Let's tackle some of the most common queries to make sure your project goes off without a hitch.
A classic one is whether you can just slap a coat of standard wall emulsion straight over gloss. It’s tempting, I get it – who doesn't love a shortcut? But this is one you really need to skip. Emulsion is made for porous surfaces like fresh plaster; it simply can't get a proper grip on the slick, sealed finish of gloss. Try it, and you'll be faced with a finish that peels off with the slightest knock.
The only way to get a lasting result is with proper prep. You have to give that new paint a surface it can actually stick to, which means cleaning, sanding, and priming are non-negotiable.
Do I Really Have to Sand Before Painting?
In a word, yes. If you want a finish that's going to last, sanding is your best friend. It’s the most reliable way to create a ‘key’ for the new paint – essentially, you're creating thousands of tiny scratches for the primer to bite into. Skipping this step is probably the number one reason paint fails on glossy surfaces.
You might see chemical deglossers, often called ‘liquid sandpaper’, sold as a dust-free alternative. While they have their place, they just don't create the same reliable mechanical bond you get from a good old-fashioned scuff with sandpaper. For anything that gets a lot of wear and tear, like doors, skirting boards, or banisters, traditional sanding is still the gold standard for a durable job.
What Is the Best Primer for Old, Yellowed Gloss?
If you're painting over old oil-based gloss that's gone that familiar creamy, yellow shade, you absolutely need a stain-blocking primer. That yellowing is caused by oils in the paint leaching to the surface over time, and trust me, it will bleed straight through most water-based paints and ruin your lovely new white finish.
A shellac-based primer or a specialist stain-blocking primer is what you need. It creates a bulletproof barrier, completely sealing in the old colour and any stains. This guarantees your new, crisp white top coat actually stays white.
How Long Should I Wait Between Coats?
This is where a bit of patience pays off massively. Rushing the drying times is a recipe for a tacky, easily-damaged finish. The paint tin is your guide here, as timings can vary a lot between brands and are always affected by the temperature and humidity of the room.
As a rough rule of thumb here in the UK:
- Water-based paints (like acrylic satin or gloss) often feel touch-dry in an hour but need 2-4 hours before you can safely recoat.
- Oil-based paints are a different beast entirely. They cure much more slowly, so you’ll need to wait at least 16-24 hours before thinking about a second coat.
At Burnt Oak Builders Merchants, we stock everything you need to get a flawless finish on your next painting project, from sugar soap and sandpapers to high-adhesion primers and durable top coats. Find all your trusted supplies at https://www.burntoaktimber.com.