
When you think about resealing the bathroom, what probably comes to mind is scraping out the old, manky silicone and laying down a fresh, clean bead. You're not wrong, but it’s more than just a quick fix. Getting this seemingly simple job right is one of the most important things you can do to prevent water damage, mould, and some seriously expensive repair bills down the road.
Why Bother Resealing Your Bathroom?
Let's be honest, that peeling, grubby-looking sealant around your bath or shower tray is more than just a bit of an eyesore. It's a big, flashing warning sign. While it’s tempting to just ignore it, failing sealant means your bathroom's waterproofing has been compromised.
Think of that silicone bead as the first and most important line of defence against water. In a room that's constantly getting hit with steam, splashes, and condensation, even the tiniest gap is an open invitation for moisture to sneak into your walls and floors. Before you know it, you’ve got the perfect breeding ground for mould and mildew – not great for your health – and eventually, rot, which can do real structural damage to your home.
It's All About Protecting Your Property
Putting off this job can lead to some expensive headaches. A tiny leak you can't even see can quickly become a major problem that needs a professional to sort out. A proper resealing job is cheap insurance for your biggest investment.
- Stop Water Damage in its Tracks: A fresh, watertight seal forms a solid barrier, keeping water out of wall cavities, plasterboard, and floor joists where it can do the most harm.
- Keep Mould at Bay: No moisture, no mould. It's as simple as that. Keeping the joints dry stops black mould from getting a foothold, making your bathroom a much healthier space.
- A Fresh, Clean Look: You’d be surprised how much difference a crisp, new bead of sealant makes. It instantly lifts the whole room, making it feel cleaner and properly looked after.
The Real Cost of Doing Nothing
Ignoring that failing sealant is a gamble, and the stakes are higher than you might think. Water damage is a common nightmare for UK homeowners, and the cost to fix rot and mould can easily climb to £1,000 to £2,000, sometimes much more. As bathrooms have evolved into more luxurious spaces, there's more at risk from water getting where it shouldn't. You can dig into the numbers on home renovation costs in this detailed report.
Taking a few hours on a weekend to learn how to reseal a bathroom properly could genuinely save you thousands in structural repair bills. It's one of the highest-impact DIY jobs you can tackle, turning a small bit of effort into massive long-term protection. This isn't just a cosmetic touch-up; it's essential home maintenance.
Your Toolkit for a Flawless Finish
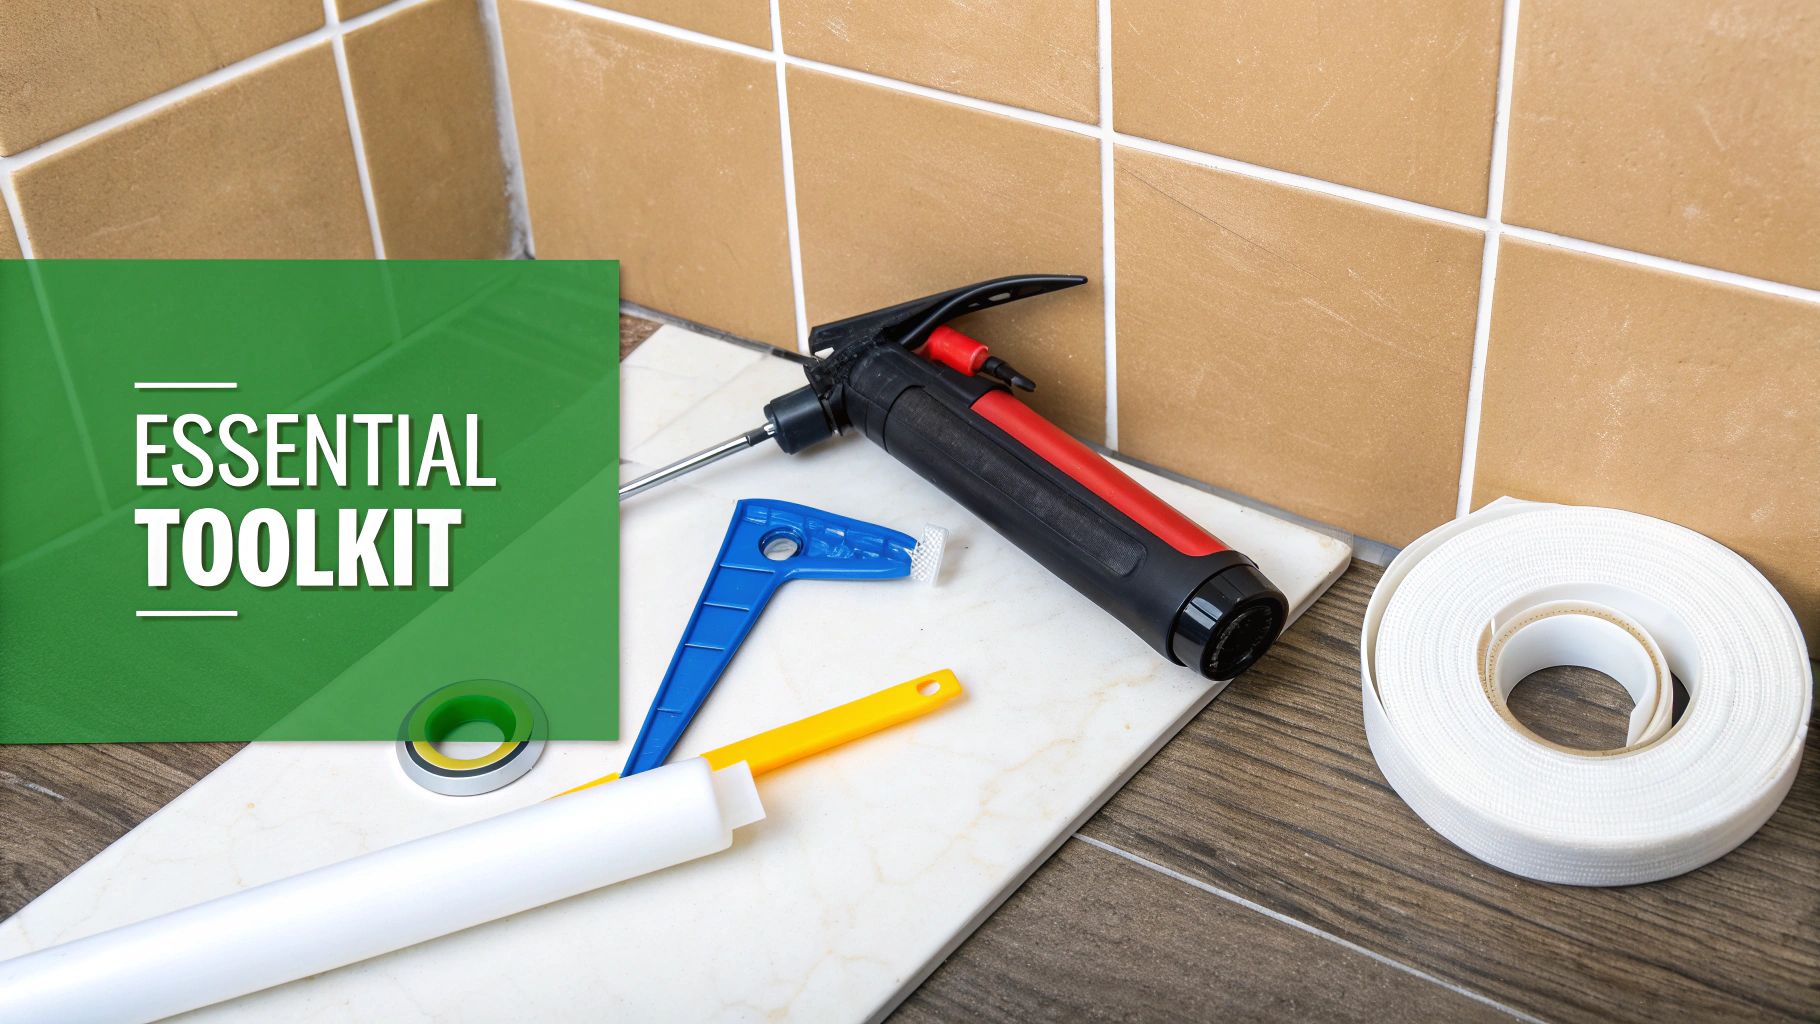
Getting that professional-looking, watertight seal isn't about luck. It all comes down to having the right gear before you start. Trust me, trying to bodge a bathroom reseal with the wrong tools is a shortcut to a messy, lumpy finish that'll probably fail in a few months. So, before you even think about scraping out that old, mouldy silicone, let’s get your kit sorted.
Think of your tools as an investment. A cheap, flimsy sealant gun might save you a couple of quid, but its jerky action makes getting a smooth, consistent bead of silicone nearly impossible. Spend a little extra on a quality gun with a smooth trigger, and you’ll have far more control. It makes all the difference.
It’s the same story with removal. You can use a Stanley knife, but a proper sealant removal tool is shaped to get right into the corners without scratching your bath, shower tray, or tiles. It just makes the most tedious part of the job that much easier. For more ideas on kitting out your home toolbox, take a look at our guide on essential tools for homeowners.
Here’s a breakdown of everything you'll need to get the job done right the first time.
| Item | Purpose | Pro Tip |
|---|---|---|
| Sanitary Silicone Sealant | Creates a waterproof, flexible barrier. Must be 100% silicone with anti-mould properties for bathrooms. | Always check the expiry date on the tube. Out-of-date silicone is a nightmare to work with and might not cure properly. |
| Quality Sealant Gun | Applies the sealant smoothly and evenly. | Look for a 'drip-stop' or 'non-drip' feature to prevent ooze after you release the trigger. It saves a lot of mess. |
| Sealant Removal Tool | Safely scrapes away old sealant without damaging surfaces. | Choose one with different-shaped heads to tackle various angles and joints effectively. |
| Sealant Removal Gel | Softens stubborn, old silicone, making it much easier to remove. | A lifesaver for really old, baked-on sealant. Apply it and leave it to work its magic before you start scraping. |
| Masking Tape | Guarantees clean, sharp edges for your new sealant bead. | Your secret weapon for a pro finish, especially if you're not confident in your freehand skills. |
| Methylated Spirits | Cleans and degreases the surface, ensuring the new sealant bonds properly. | Don't skip this step! Any residue, even soap scum, can stop the new silicone from sticking. |
| Lint-Free Cloths/Paper Towels | For applying the methylated spirits and cleaning up any mess. | You'll need more than you think. Keep a roll handy. |
| Sealant Smoothing Tool | Shapes the fresh silicone bead into a neat, concave profile. | A wet finger works, but a dedicated tool (or even the back of a plastic spoon) gives a more consistent finish. |
Having these bits and pieces laid out before you begin will make the whole process smoother and give you a result you can be proud of.
Choosing the Right Sealant
Let's talk about the most important item on that list: the sealant itself. For a bathroom, you absolutely must use a 100% silicone sanitary sealant. Don't be tempted by a general-purpose filler or a painter's caulk – they just can't handle the constant moisture and will fail, leaving you with leaks and mould.
When you’re at the shop, look for tubes that specifically mention anti-mould or fungicidal properties. This is non-negotiable. These formulae have special additives that stop black mould from growing, keeping your sealant looking clean and fresh for years to come.
Pro Tip: When you're picking your sealant, give the expiry date a quick check. Using out-of-date silicone is a false economy—it can be a pain to apply and might not cure correctly, meaning you’ll just have to do the job all over again.
Removing Old Sealant Without Damaging Surfaces
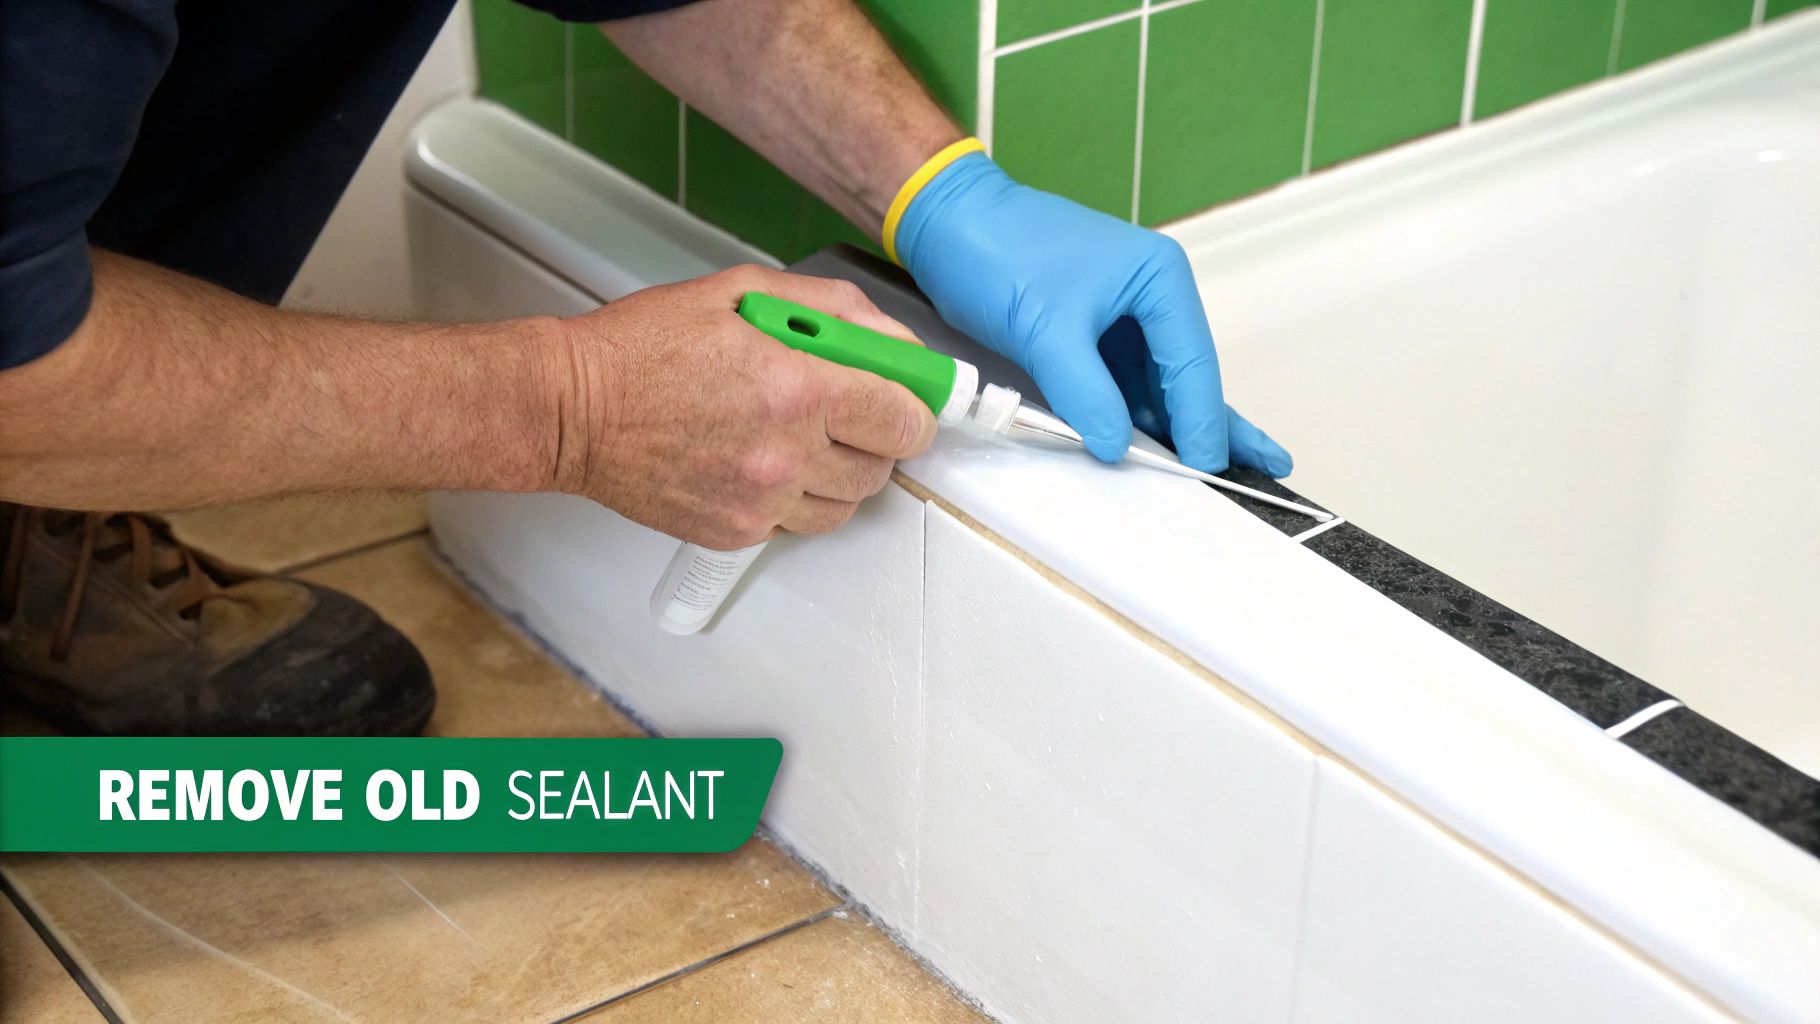
Right, this is where the real work begins. Honestly, it’s the stage where most jobs go wrong. If you rush the removal of that old, manky sealant, you're setting yourself up for a poor finish that’ll fail in no time. The aim isn't just to rip out the bulk of it; you need to leave behind a perfectly clean, residue-free surface for the new silicone to grab onto. For a waterproof seal that lasts, a pristine foundation is everything.
Patience really is your best friend here. Old silicone can be unbelievably stubborn, especially if it’s been sitting there for years. Your first thought might be to just go at it with a Stanley knife, but that's asking for trouble. It's far too easy for the blade to slip and put a permanent scratch in an acrylic bath or take a chip out of a tile.
A much safer bet is a dedicated sealant removal tool. They’re usually made of hard plastic and are specifically designed to get under the edge of the bead and lift it away without gouging the surfaces underneath.
Softening Stubborn Silicone
For sealant that’s basically fossilised, a silicone remover gel is a game-changer. These products are designed to break down the silicone chemically, turning it from a tough rubber into a soft paste that’s a doddle to scrape away.
Just squeeze a thick layer of the gel over the old sealant and let it do its thing. The packaging will tell you how long to leave it, but you can usually see it working as the sealant starts to soften and swell up. Once the time is up, the old bead should come away with hardly any effort.
Perfecting Your Removal Technique
After the remover gel has worked its magic, it's time to get scraping. How you do this makes a big difference in avoiding those annoying little bits of residue that will ruin your new seal.
- Start at a corner: Find a bit that's already loose or use your removal tool to carefully lift a corner of the old sealant.
- Pull, don't just scrape: Once you’ve got a good grip, try to pull the sealant away in one long, continuous strip. It's much cleaner and faster than scraping it off in tiny chunks.
- Keep your tool at a low angle: Hold your removal tool at a shallow angle to the surface, somewhere around 30-45 degrees. This helps you get right underneath the bead without digging into the bath or tiles.
Here's a pro tip: The biggest mistake I see is people leaving behind a thin, almost invisible film of old silicone. This greasy residue is the number one enemy of a good bond. After you've removed the main bead, you have to clean the area meticulously.
Even after a good scrape, you’ll probably find small, stubborn bits clinging on for dear life, especially right in the corners. Use the sharp edge of your removal tool or even an old plastic card to gently work these last bits free. It’s a bit tedious, I know, but this attention to detail is what separates a professional job from a DIY disaster.
Preparing the Surface for a Lasting Bond
Right, with the old sealant ripped out, you’ve arrived at the most critical part of the entire job. Honestly, this is where it all goes right—or horribly wrong. A new bead of silicone is only as good as the surface it’s sticking to. If you slap it over invisible soap scum, old residue, or even a hint of damp, I guarantee it will fail.
This is the classic DIY pitfall. Rushing this stage means you'll be back here in a few months, peeling away a failed seal that let moisture sneak in behind it. Spend an extra 15 minutes getting this right, and you'll have a seal that lasts for years, not months.
Getting the Joint Spotless
Forget your standard bathroom spray. Most of them contain silicones or leave a film behind, which is the last thing you want when you need your new sealant to stick like glue. You need something that will cut through every last bit of grease and grime without leaving a trace.
Your best bet for this is either:
- Methylated spirits: A fantastic degreaser that flashes off quickly, leaving a perfect surface.
- Isopropyl alcohol (IPA): Does the same job brilliantly and is easy to get hold of.
Just get some on a clean, lint-free cloth and give the joint and the surrounding tiles a proper wipe-down. This is also a great time to tackle any stubborn hard water stains on your tiles or shower screen with a specialist product like Astonish Glass & Tile Cleaner.
Making Sure It's Bone-Dry
Silicone and water are mortal enemies until that bead has fully cured. I mean it—even the slightest bit of moisture left in the joint will wreck the bond and create a weak point from day one. After cleaning, the whole area has to be completely and utterly dry.
Pro Tip: Don't just wipe it with a towel and hope for the best. Grab a hairdryer and blast the joint for a couple of minutes. Make sure you get right into the corners. This little trick forces out any moisture hiding in the grout or tiny cracks that you can't see.
The Secret to Razor-Sharp Edges
Okay, last step before the fun part. Masking tape. This is the secret to getting those dead-straight, professional-looking lines.
Run a strip of good-quality masking tape along both sides of the joint, leaving a gap of a couple of millimetres from the corner on the wall and the bath or tray. This creates a perfect channel to guide your sealant and stops any messy smudges. It might seem a bit fussy, but peeling it off later to reveal a perfect, crisp line is one of the most satisfying moments of any DIY job.
This prep work really does pay off, and it’s why so many renovators are focused on getting waterproofing right. In fact, 75% are now using modern sealing solutions to protect their homes and save money in the long run. You can find out more about what's driving renovators in the 2025 UK Houzz & Home Report.
Applying New Silicone Like an Expert
Alright, the old gunk is gone and the surface is spotless. Now for the main event. Applying that new bead of silicone can feel a bit daunting, but honestly, the secret is all in the technique. Get this right, and you'll have a flawless, waterproof seal that looks every bit as good as a pro job.
Laying the Perfect Bead
First things first, let's get the cartridge ready. Take a sharp knife and carefully snip off the very tip of the cartridge’s threaded nozzle. Screw on the separate plastic nozzle, then cut the end of that off at a 45-degree angle. The size of the hole dictates the size of your bead, so always start smaller than you think you need – you can always cut it a bit wider. A good rule of thumb is to make the hole about the same width as the gap you're filling.
Pop the cartridge into your sealant gun and make sure it’s snug. Now, give the trigger a few gentle squeezes until you see the silicone just begin to peek out from the nozzle. This gets rid of any air pockets and means you won't get a sudden messy splutter when you start for real.
When it's time to apply, the aim is one smooth, continuous bead. Hold the gun at a steady 45-degree angle to the joint. Apply firm, even pressure on the trigger and move along the joint at a constant speed. If you go too slow, you’ll end up with a bulky, lumpy mess. Too fast, and the bead will be thin and patchy.
Try to do each length in one go without stopping. It’s all about finding a comfortable rhythm. If you absolutely have to pause, release the trigger pressure immediately to stop a big blob from forming where you stopped.
As a quick refresher on the prep work, this visual guide is a great reminder of the crucial steps you need to take before you even think about picking up the sealant gun.
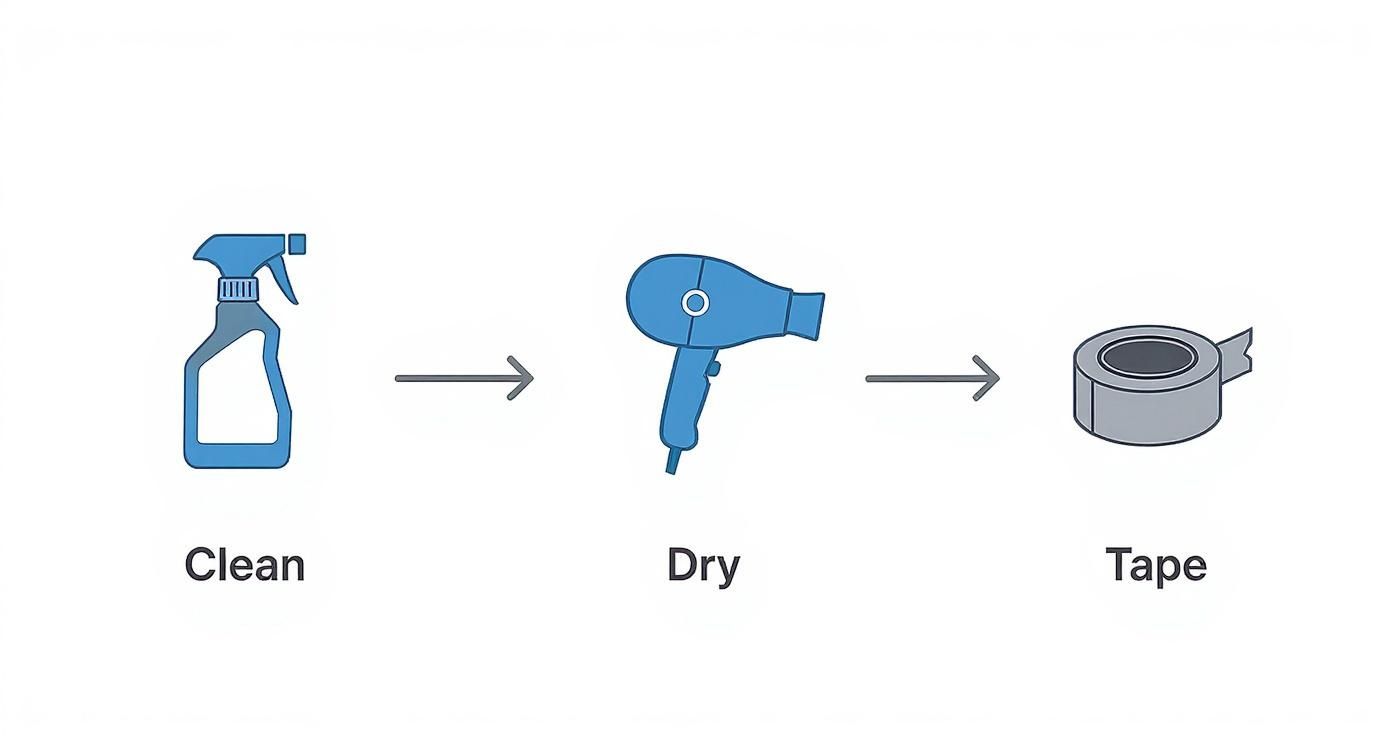
Seriously, don't skip this part. The simple flow—clean, dry, and tape—is the absolute foundation for a good, lasting seal.
Tooling for a Professional Finish
Once the bead is down, you need to ‘tool’ it. This just means smoothing the silicone out, pushing it firmly into the joint to create a perfect seal, and giving it that neat, concave finish. You've got a few options for this:
- The Wet Finger: The classic, old-school method. Dip your finger in some soapy water (washing up liquid works fine) and run it smoothly along the bead. The soap is key – it stops the silicone from sticking to your skin.
- A Specialised Tool: You can buy cheap plastic sealant tools with different profiles and angles. They're brilliant for getting a really consistent finish every single time.
- A Soapy Teaspoon: In a pinch, the curved back of a teaspoon dipped in soapy water does a surprisingly good job of creating a neat, uniform curve.
Whatever you use, keep a roll of paper towel handy. You'll need it to constantly wipe off the excess silicone as you go.
The golden rule of tooling: do it immediately. As soon as you've laid the bead, get it tooled. If you wait even a few minutes, the silicone will start to form a skin, and trying to smooth it then will just make an unholy mess.
The Final, Satisfying Step
With the bead looking perfect, it's time for the best part of the whole job: peeling off the masking tape. Do this straight away, while the silicone is still wet. Pull the tape away from the joint at a 45-degree angle. This will leave you with a perfectly crisp, sharp line that makes all that careful prep worth it.
This attention to detail is what separates a DIY job from a professional one. When you consider that tiles are the hero feature for 40% of renovators, a messy seal can ruin the whole look. It’s no surprise that over 43% of homeowners hire bathroom fitters for refurbishment projects – they value that polished finish. For a reliable product that will help you achieve it, have a look at our Everbuild general purpose silicone.
Curing and Aftercare for a Long-Lasting Seal
You’ve laid down that perfect, smooth bead of silicone and it feels like the job is done. But hold on a minute—what happens next is just as crucial. The silicone now needs to cure properly to create that tough, waterproof barrier you're after.
This isn’t just a simple drying process. Curing is a chemical reaction where the sealant pulls moisture from the air to harden all the way through. If you rush this part, all your careful work will be for nothing.
Most sanitary silicones will feel touch-dry in about an hour, but don't be fooled. That’s just a skin forming on the surface. Underneath, it's still soft and vulnerable.
To be safe, you need to keep the area completely dry for a minimum of 24 hours. If the bathroom is a bit chilly or doesn't have great ventilation, it's wise to give it even longer.
Curing is about achieving full strength and flexibility, not just being dry to the touch. Jump in the shower too early, and you'll literally wash away your uncured sealant, creating weak points that are guaranteed to leak down the line.
Keeping Your New Seal in Top Condition
Once your new seal is fully cured, a bit of simple maintenance will make it last for years. The biggest enemy of a good silicone seal is harsh, abrasive cleaning. Scouring pads and aggressive chemicals will quickly wear it down and destroy its mould-resistant properties.
Here’s how to look after it:
- Clean Gently: Stick to a soft cloth and a mild, pH-neutral bathroom cleaner. Anything designed for everyday bathroom cleaning will do the trick.
- Steer Clear of Bleach: Chlorine is incredibly effective at breaking down silicone. Regular use will cause it to become brittle and fail prematurely.
- Wipe it Down: After you've had a shower, a quick wipe over the sealant with a towel or squeegee makes a huge difference. It removes soap scum, which is what mould loves to feed on.
Follow these simple aftercare tips, and the job you’ve just done will be a long-term fix, not just a temporary patch-up. It means you won't have to be re-doing it all over again in a year's time.
Got a Question About Resealing Your Bathroom?
Even the most straightforward jobs can throw up a few questions. When it comes to resealing, we hear the same queries time and time again. Here are some quick, no-nonsense answers based on years of experience on-site.
How Long Until I Can Use My Shower After Sealing?
This is the big one, and getting it wrong can ruin all your hard work. Most sanitary silicones will feel touch-dry within an hour or so, but don't be fooled—that's just a skin forming on the surface.
The sealant needs to cure right through to the back of the joint to be truly waterproof. You absolutely must leave it untouched and, most importantly, completely dry for a minimum of 24 hours. If the bathroom is a bit chilly or doesn't have great airflow, I’d always play it safe and give it 48 hours.
Can't I Just Put New Sealant Over the Old Stuff?
I know it's tempting to look for a shortcut, but trust me on this one: absolutely not. Applying a fresh layer of silicone over old, tired sealant is a guaranteed way to make sure you'll be doing the job all over again in a few months.
New silicone simply won't stick properly to cured silicone. Worse still, you're just trapping all that old grime and mould underneath. That mould will happily munch its way through your new bead from behind, causing it to peel away and fail in no time.
For a lasting, professional result, there are no shortcuts. Applying new sealant over old is a false economy—you'll only end up doing the job all over again in a few months' time.
Why Did My Brand New Sealant Go Mouldy?
It’s incredibly frustrating to see black spots appear on a freshly sealed joint, isn't it? This almost always comes down to one of two culprits.
First is preparation. If the surface wasn't spotlessly clean and bone dry before you started, you've basically left a food source for mould spores. Any trace of soap scum, grime, or moisture gives them the perfect head start.
The second reason is often the product itself. Using a cheap, general-purpose sealant instead of a proper sanitary silicone with a powerful fungicide is a common mistake. Always invest in a quality brand designed specifically for bathrooms; it makes all the difference.
For all the high-quality sealants, tools, and materials you need to get the job done right, visit Burnt Oak Builders Merchants. Find everything for your project at the Burnt Oak Timber and Builders Merchants website.