
Installing new guttering isn't just about sticking a few bits of plastic to the side of your house. To get a professional, leak-free finish that lasts for years, you need to get the prep work right. This means checking your fascia boards are up to the job and then carefully measuring, cutting, and fixing everything with a slight downward slope—what we call the 'fall'—towards the downpipe.
Nail the preparation, and the rest of the job will be a breeze.
Getting Started: Prep Work is Key
Before you even think about buying your guttering, a bit of planning will save you a world of headaches later on. It’s tempting to jump straight into fitting the brackets, but that’s how you end up with sagging gutters, overflowing water, and even damage to your home’s brickwork and foundations.
A well-installed system is your home's first line of defence against water damage. It’s crucial to prevent ceiling leaks and other damp issues that often start with poorly managed rainwater. The first, and most important, job is to give your fascia boards a thorough once-over.
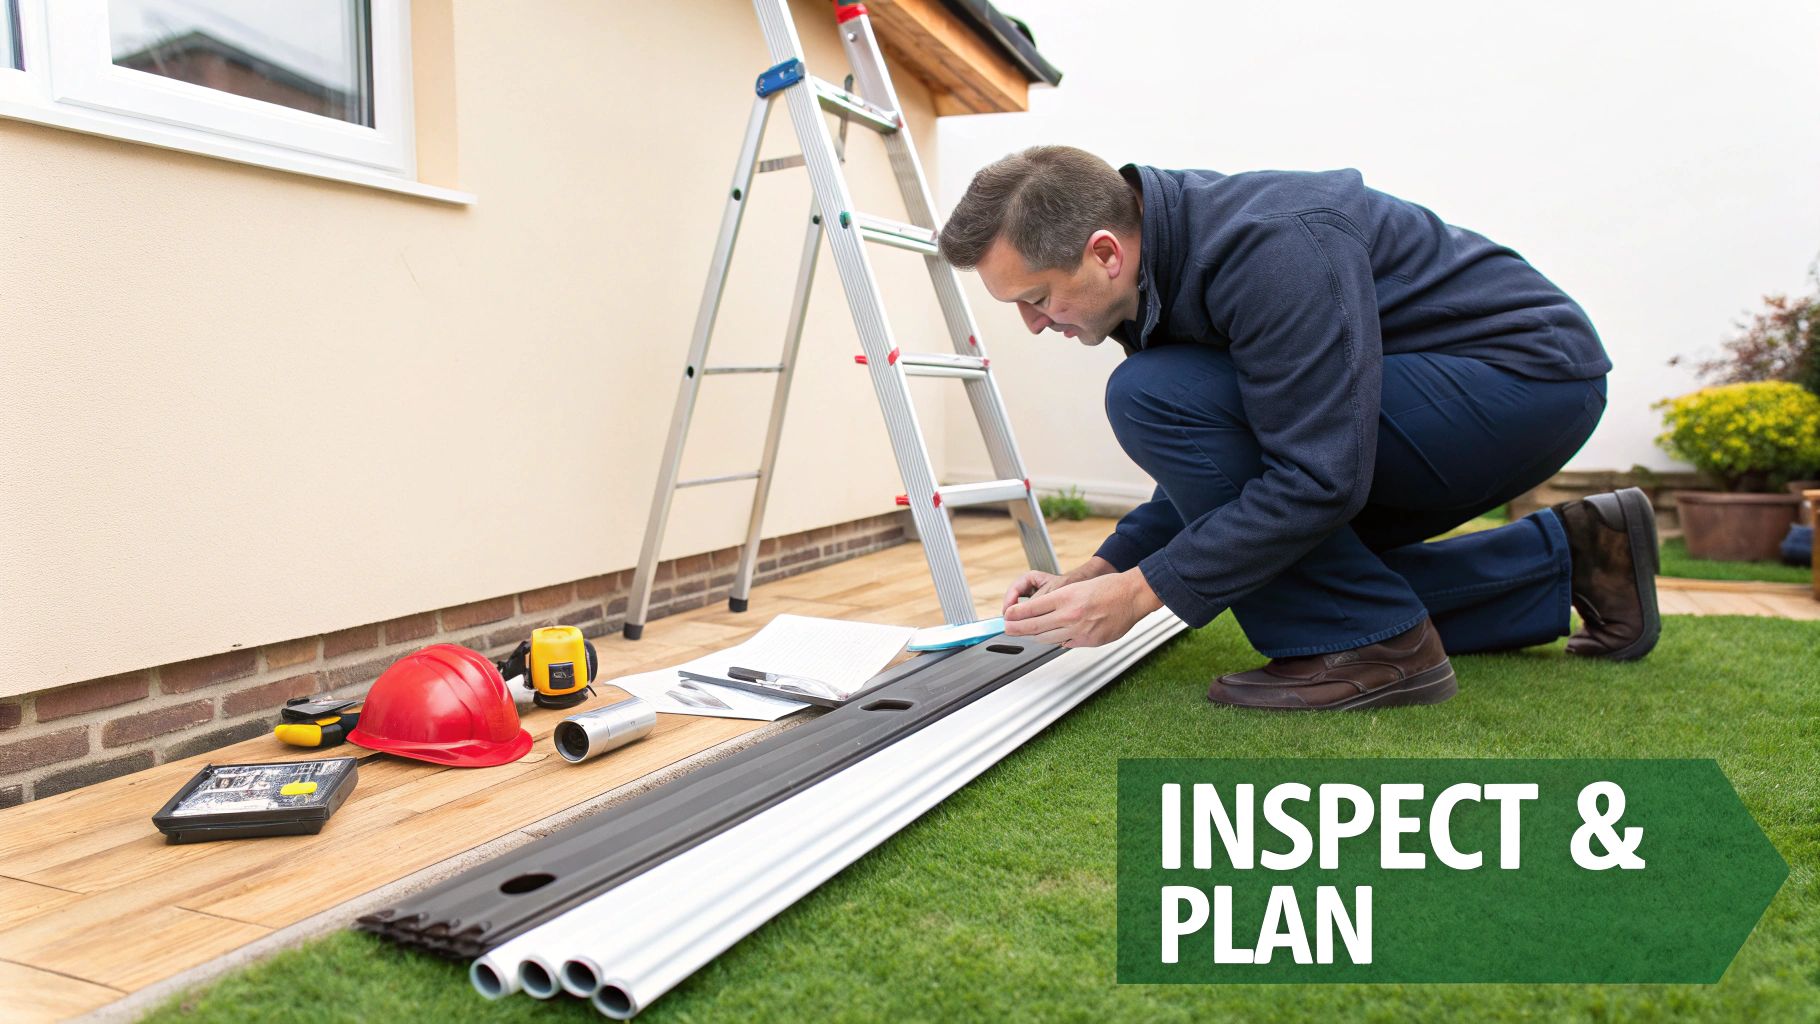
Check Your Fascia Boards
Your new guttering will only ever be as solid as the surface it's fixed to. Get your ladder out and take a close look at the timber or uPVC fascias all around the house. You’re looking for a few tell-tale signs of trouble:
- Rot in Timber: Gently push a screwdriver into the wood. If it feels soft, spongy, or just crumbles away, that section is rotten and needs replacing.
- Flaking Paint and Stains: These are often the first clue that moisture has been getting into the wood.
- Cracks and Damage: On uPVC fascias, look for any physical damage that might weaken the board and prevent a secure fixing.
It's simple: any damaged sections have to be repaired or replaced before you go any further. Attaching heavy, water-filled gutters to weak or rotten fascias is asking for trouble. They just won't hold the weight, and the whole lot could come down in the first heavy storm.
Choose Your Guttering Material
Next up is deciding what your gutters will be made of. This choice comes down to your home's style, your budget, and how much maintenance you're prepared to do.
In the UK, the average cost for a professional to replace guttering is around £650, with a typical job taking about six hours. The material cost per metre varies wildly, from £45-£50 for standard uPVC to significantly more for premium options like cast iron.
Choosing the right material is a balance of aesthetics, budget, and practicality. Here’s a quick rundown of what you’ll find at most builders' merchants.
Guttering Material Comparison for UK Homes
| Material | Average Cost per Metre (£) | Typical Lifespan (Years) | Key Advantages |
|---|---|---|---|
| uPVC (Plastic) | 5 - 15 | 20 - 30 | Lightweight, affordable, easy for DIY installation, and comes in various colours. |
| Cast Iron | 30 - 60+ | 50 - 100+ | Extremely durable, traditional aesthetic perfect for period homes, can be repainted. |
| Aluminium | 20 - 40 | 25 - 40 | Rust-proof, lightweight, available in seamless lengths to minimise leaks, modern look. |
| Steel (Galvanised/Coated) | 15 - 35 | 20 - 40 | Very strong, high capacity for water flow, resistant to damage from ladders or storms. |
Ultimately, for most modern homes and DIY projects, uPVC is the go-to choice. It’s forgiving to work with and delivers great results without breaking the bank. However, if you’re working on a period property or want something more robust, it's worth weighing up the long-term benefits of metal systems.
Assembling Your Guttering Toolkit and Components
Before you even touch a ladder, getting everything organised on the ground is the secret to a smooth, professional installation. A bit of prep work now will save you countless trips up and down, turning a potentially frustrating day into a satisfying one. It’s all about getting the job done right the first time.
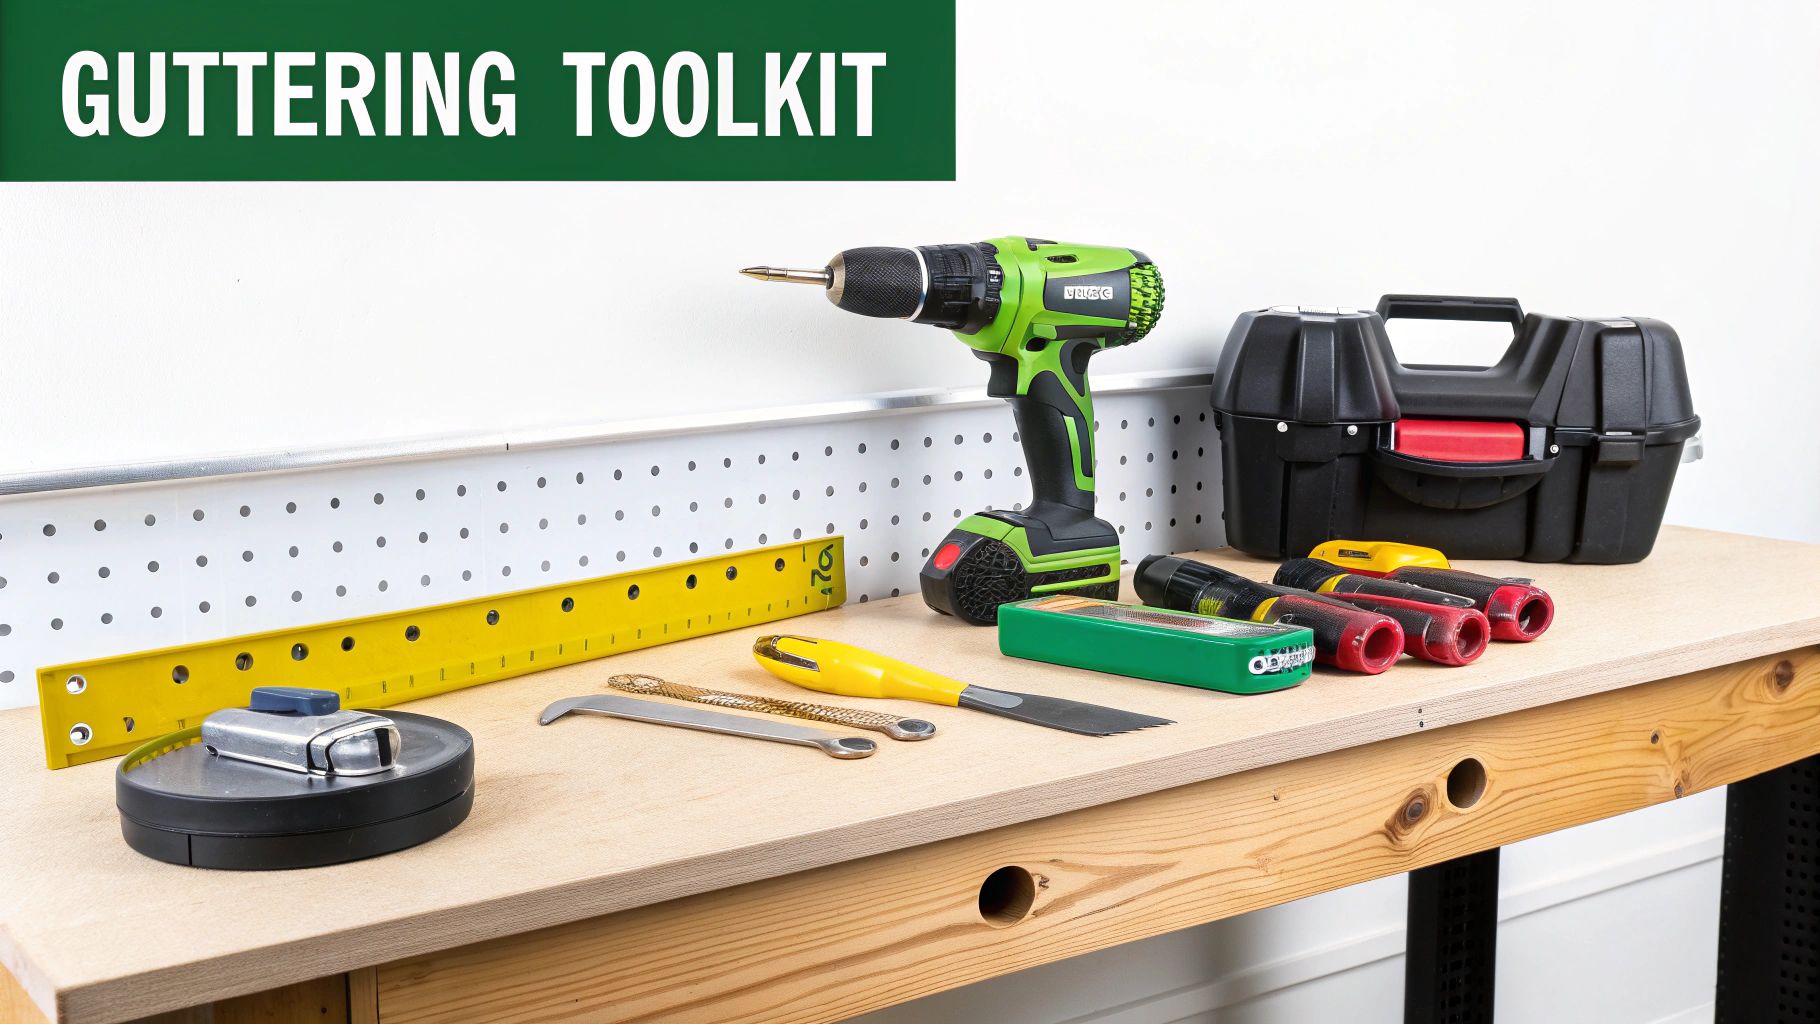
First up, let’s talk tools. You don’t need a high-end workshop, but a handful of key items are absolutely non-negotiable if you want a precise fit. For a good look at what every homeowner should have ready, our guide on the essential tools for homeowners will come in handy for this project and plenty more down the line.
The Essential Guttering Toolkit
Having these items within arm's reach will make the entire job go much more smoothly:
- Cordless Drill/Driver: This is your workhorse for fixing fascia brackets quickly and securely. You'll be glad you have it.
- Spirit Level: Go for a long one, at least 1200mm. It makes checking the fall across multiple brackets at once so much easier.
- Hacksaw: A fine-toothed blade is what you need for getting clean, straight cuts through uPVC guttering.
- String Line & Chalk: This simple combo is your best friend for snapping a perfectly straight, accurately sloped guide for bracket placement.
- Tape Measure: An obvious one, but crucial for measuring your gutter runs, downpipe lengths, and bracket spacing.
Understanding the Guttering Components
Next, get to know the different parts you'll be working with. Guttering systems fit together a bit like a construction kit, and each piece has a specific job to do.
- Running Outlet: This is the critical piece that connects your guttering to the downpipe.
- Stopend: As the name suggests, these cap the end of a gutter run, stopping water from spilling over the edge.
- Union Bracket: You'll use this to join two lengths of guttering together while also providing crucial support at the join.
- Fascia Bracket: These are the backbone of the system, screwed directly to the fascia board to hold the full weight of the gutter.
- Offset Bends: You'll almost certainly need a pair of these to create a 'swan neck' that brings the downpipe from under the eaves back towards the wall.
A question I get asked all the time is how many fascia brackets are needed. As a rule of thumb, you should place a bracket no more than 1 metre apart. So, for a 10-metre run of guttering, you’d need a minimum of 11 brackets for solid support. I always recommend buying a couple of spares, just in case.
Getting the Gutter Fall Right for Perfect Drainage
If there's one thing you absolutely must get right when fitting new guttering, it's the 'fall'. This is just a gentle, consistent slope that guides rainwater directly to the downpipe. Without it, water will just sit there, eventually overflowing and creating damp problems for your walls. Get the fall wrong, and even the most expensive guttering system won't do its job.
The trick is to create a gradient that's effective but not so steep that it looks odd from the ground. Too much of an angle can cause water to splash straight over the downpipe outlet in a heavy downpour. Too little, and you'll get standing water, which is a magnet for moss and insects and will eventually cause the gutter to sag under the weight.
Calculating the Perfect Angle
In the UK, the tried-and-tested standard for gutter fall is a ratio of 1:350. That might sound a bit technical, but it’s actually dead simple. It works out to a drop of just under 3mm for every 1 metre of gutter. So, if you have a 10-metre run, you’re looking for a total drop of about 30mm (or 3cm) from the high end to the low end.
Nailing this small measurement is what separates a professional-looking job from a DIY disaster. It’s the difference between a system you never have to think about and one that causes you headaches every time it rains.
You might be tempted to just eyeball it, but don't. A spirit level is handy for a quick check, but for setting the gradient accurately over a long stretch, nothing beats a simple string line.
Here’s how to set your fall without any guesswork:
-
Establish Your High Point: Go to the end of the gutter run that's furthest from the downpipe. This will be your starting point. Fix the first fascia bracket here, about 100mm in from the end of the fascia board. Position it so the top edge of the gutter will sit just below the roof tiles, ready to catch the water as it runs off.
-
Mark the Low Point: Now, head over to the other end where the running outlet (the bit that connects to the downpipe) will be. Using our 3mm per metre rule, calculate your total drop. For a standard 6-metre length of guttering, you'd need a fall of 18mm (6 x 3mm). Measure 18mm down from the height of your first bracket and make a clear mark on the fascia.
-
Set Up a Guide Line: Pop a nail part-way into the fascia at your high and low marks. Tie a builder's string line tightly between the two nails. This taut line is now your perfect, unwavering guide for the correct gutter fall. All you have to do is make sure the top of every other bracket you fit sits flush against this line. It completely takes the guesswork out of the equation.
Fixing Brackets and Fitting Gutter Sections
With your string line in place, you’ve got a perfect visual guide for the next step: building the support structure for your new guttering. This is where the system starts to take physical shape on your fascia boards, so getting the fixings secure and precisely aligned is absolutely key.
Your first job is to get the fascia brackets up. I always start at the outlet end (the low point) and work my way up towards the high point. Fix a bracket at each end of the string line first, then fill in the ones in between. You'll want to space them no more than one metre apart.
As a rule of thumb, I also like to add extra support near any joints or fittings. Placing a bracket about 150mm away on either side gives the system a bit more rigidity right where it needs it most.
Securing the Brackets Correctly
Picking the right screws is more important than you might think. If you're fixing to timber fascias, make sure you use galvanised or stainless steel screws. They need to be long enough to get a really solid bite into the wood, but not so long they poke through the back. For uPVC fascias, you’ll need self-tapping screws made for plastic to stop it from cracking.
A Quick Tip From Experience: If you're using a cordless drill on uPVC, turn the torque setting right down. It's incredibly easy to overtighten the screw and strip the hole, which means the bracket won't be secure. You're just looking for a snug fit, nothing more.
This diagram shows you exactly how the high point, string line, and low point all work in harmony to create that crucial fall for proper drainage.
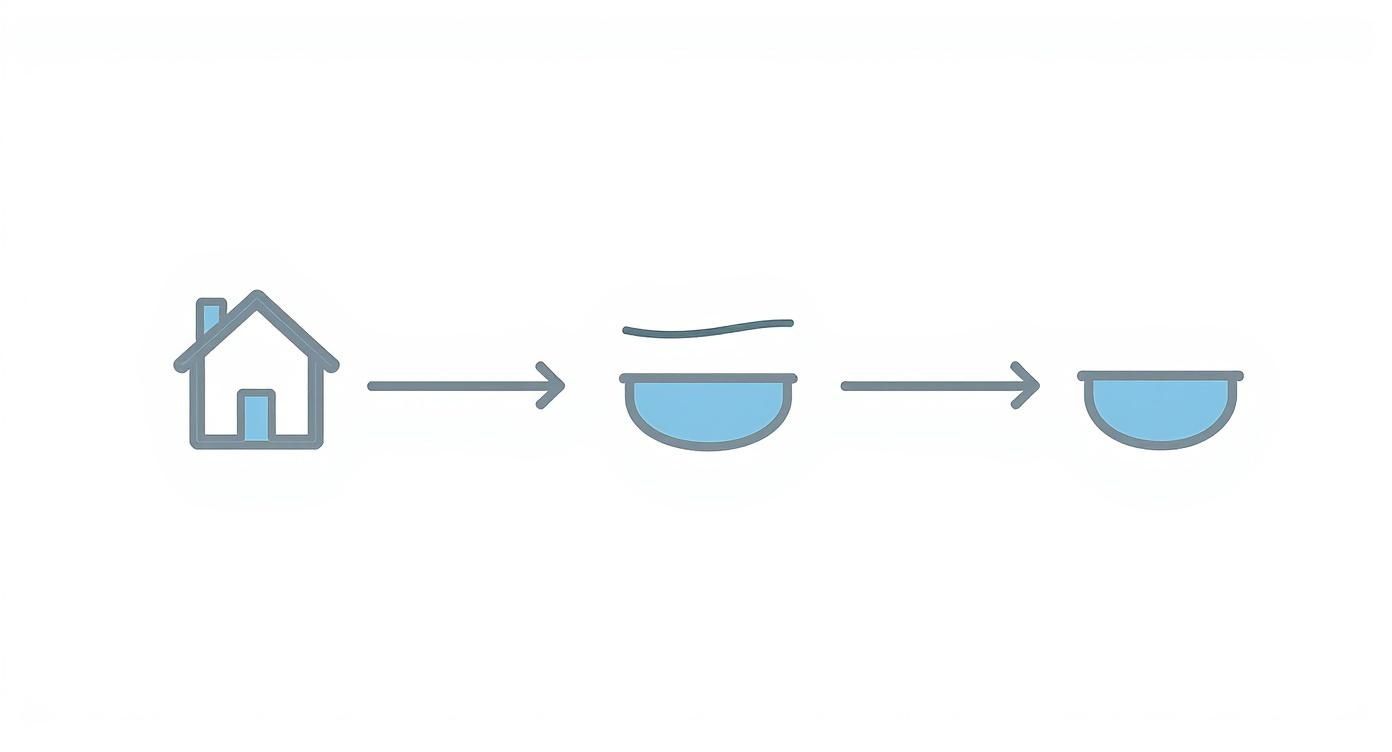
It’s a simple but effective method that takes all the guesswork out of the equation. Every single bracket will be perfectly positioned to channel rainwater exactly where you want it to go—down the drainpipe.
Cutting and Fitting Gutter Lengths
Once all your brackets are firmly in place, it’s time to start laying in the gutter sections. Begin with the piece that connects to the running outlet. Measure the length you need, mark it carefully, and cut it with a fine-toothed hacksaw for a clean, straight edge. A quick once-over with a file or a bit of sandpaper will smooth off any burrs.
Modern uPVC guttering is brilliant because it's designed to be fitted easily. To get a section in, you just rest the back edge of the gutter into the rear clip of the bracket. Then, apply a bit of gentle pressure to the front edge until it clicks satisfyingly into the front clip.
You can find a great selection of high-quality uPVC fascia brackets that use this simple, secure mechanism. That click is your confirmation that the gutter is seated properly. Just work your way along the run, fitting each length and making sure every piece is firmly clicked into its bracket.
Creating Watertight Seals and Assembling the Downpipe
Once your gutter sections are clipped firmly into their brackets, it’s time for the final, crucial stage: making the whole system completely leak-proof. This is where we’ll focus on sealing up the joints and properly assembling the downpipe, which is vital for guiding rainwater away from your home's foundations.
Getting these last few steps right is what really makes the difference between a professional-looking job and a leaky mess that could cause you headaches down the line.
Joining Gutter Lengths for a Perfect Seal
When you need to connect two lengths of guttering, you'll be using a union bracket. This handy component does two jobs at once: it provides support right at the join and contains a rubber seal to create a watertight connection.
Before you slot the gutter ends in, give the rubber seals inside the bracket a quick wipe. You want them totally free of any dust or grit, as even a tiny bit of debris can compromise the seal and lead to annoying drips. When you push the gutter sections into the bracket, make sure they go past the little insertion marks you'll see moulded into the plastic. This ensures a snug, secure fit.
A common mistake is to slap silicone sealant on standard uPVC gutter joints. Don't be tempted! The whole system is designed to expand and contract with the temperature changes. The rubber seals are built to handle this movement, but a rigid sealant will just crack and fail, leaving you with a leak.
Navigating Obstacles with Offset Bends
Next up, you need to get the water from the running outlet and down the wall. On pretty much every UK house, the soffit and fascia mean the downpipe can't sit flush against the wall. This is where offset bends are your best friend.
You'll need two of these bends to create what we call a "swan neck". One bend fits directly onto the spigot of the running outlet, while the other connects to the very top of your main downpipe. A short, straight bit of pipe joins the two bends together. It’s an elegant solution that brings the pipework out from under the eaves and back against the wall, ready for you to secure it.
Assembling and Securing the Downpipe
With the swan neck in place, you can now attach the main lengths of downpipe. The process itself is pretty straightforward:
- Measure and Cut: Hold a full length of downpipe against the wall. Mark where you need to cut it so that the downpipe shoe at the bottom will sit at the right height.
- Fix the Clips: Using a drill and the right wall plugs for your wall type, secure the downpipe clips. For solid support, make sure you space them no more than 1.8 metres apart.
- Slot and Secure: Fit the downpipe sections into the clips, ensuring each piece slots neatly into the one above it. It usually just takes a firm push. The clips will then hold everything tightly against the wall.
For a system that's built to last, it pays to use quality parts like this 68mm black round downpipe, a standard size for most homes. The final piece of the puzzle is the downpipe shoe, which you should angle to direct water away from the house, either into a drain or a water butt.
Proper assembly here is non-negotiable. Poorly managed rainwater can lead to penetrating damp, rotting fascias, and expensive structural problems. With our ever-changing weather, it’s a risk you don’t want to take.
Answering Your Guttering Installation Questions
Even with the best-laid plans, a few questions always pop up on the job. When you're learning how to install guttering, it’s completely normal for things to come up as you go. Let's tackle some of the most common queries I hear from DIYers with some practical, straight-to-the-point answers.
How Do I Know if My Fascia Boards Are Rotten?
Before you even think about drilling a single hole, you need to give your fascia boards a thorough check. The most reliable way to do this is to take a screwdriver and gently poke the wood in a few different spots. Pay close attention to the ends of the boards and any joints, as that's where water tends to get in.
If the screwdriver sinks in easily or the wood feels soft and spongy, it’s got to go. Also, be on the lookout for peeling paint or dark, damp-looking patches—these are the tell-tale signs of moisture creeping in. Your new guttering needs a rock-solid foundation, and attaching it to rotten wood is just asking for it to sag and fail down the line.
What’s the Best Way to Cut uPVC Guttering Cleanly?
A clean, square cut is non-negotiable if you want a snug fit and a watertight seal. Forget fancy tools; your best friend here is a simple, fine-toothed hacksaw.
Here’s how to get a pro finish every time:
- Mark it up: Use a pencil and a set square to draw a crisp, straight line all the way around the gutter section.
- Hold it steady: Don't try and cut a loose piece of gutter. Clamp it firmly in a workbench or get someone to hold it for you. Any wobbling will ruin your cut.
- Let the saw work: Use long, smooth strokes and don't force it. Trying to rush it can easily crack or shatter the plastic.
- Tidy the edge: Once you've made the cut, take a file or a bit of sandpaper and smooth off any rough burrs. This little step makes a huge difference when you're pushing the sections together.
A smooth edge is crucial because it allows the gutter to slide perfectly into the rubber seals inside the union brackets. It’s one of those small details that prevents annoying drips from the very beginning.
Can I Join New Plastic Guttering to Old Cast Iron?
Absolutely. This is a really common job here in the UK, especially when you're working on an older house, and it's completely doable. You can't just shove them together, though. You'll need a specific gutter adaptor made for the job.
You can pick these up from any good builders' merchant. They're cleverly designed to fit snugly into the collar of the old cast iron downpipe, creating a new connection point that your uPVC downpipe can slot right into. It's the right way to get a reliable, leak-free join between the old system and the new.
How Often Should I Be Cleaning My New Gutters?
Right, the installation is done—now it's all about keeping it that way. To get the most life out of your new system, plan on giving your gutters a good clean-out at least twice a year. A good routine is once in late autumn after the trees have dropped their leaves, and again in late spring to clear out any moss or debris from the winter.
Of course, if your house is surrounded by tall trees, you might find you need to do it more often. Now that you've done the hard work, the last thing you want is a blockage causing problems. Understanding how to clean downspouts and gutters properly is the key to preventing the very water damage you set out to fix.
At Burnt Oak Builders Merchants, we stock everything you need to complete your guttering project, from high-quality uPVC sections to all the essential brackets, outlets, and downpipes. Get the right materials for a professional finish at https://www.burntoaktimber.com.