
There's an old saying in the trades: the job is only as good as your prep. Nothing could be truer when it comes to fixing a hole in the wall. Getting your toolkit sorted before you even think about mixing filler will save you countless headaches and panicked trips to the DIY shop. It’s the secret to a genuinely professional finish.
Gathering Your Essential Wall Repair Toolkit
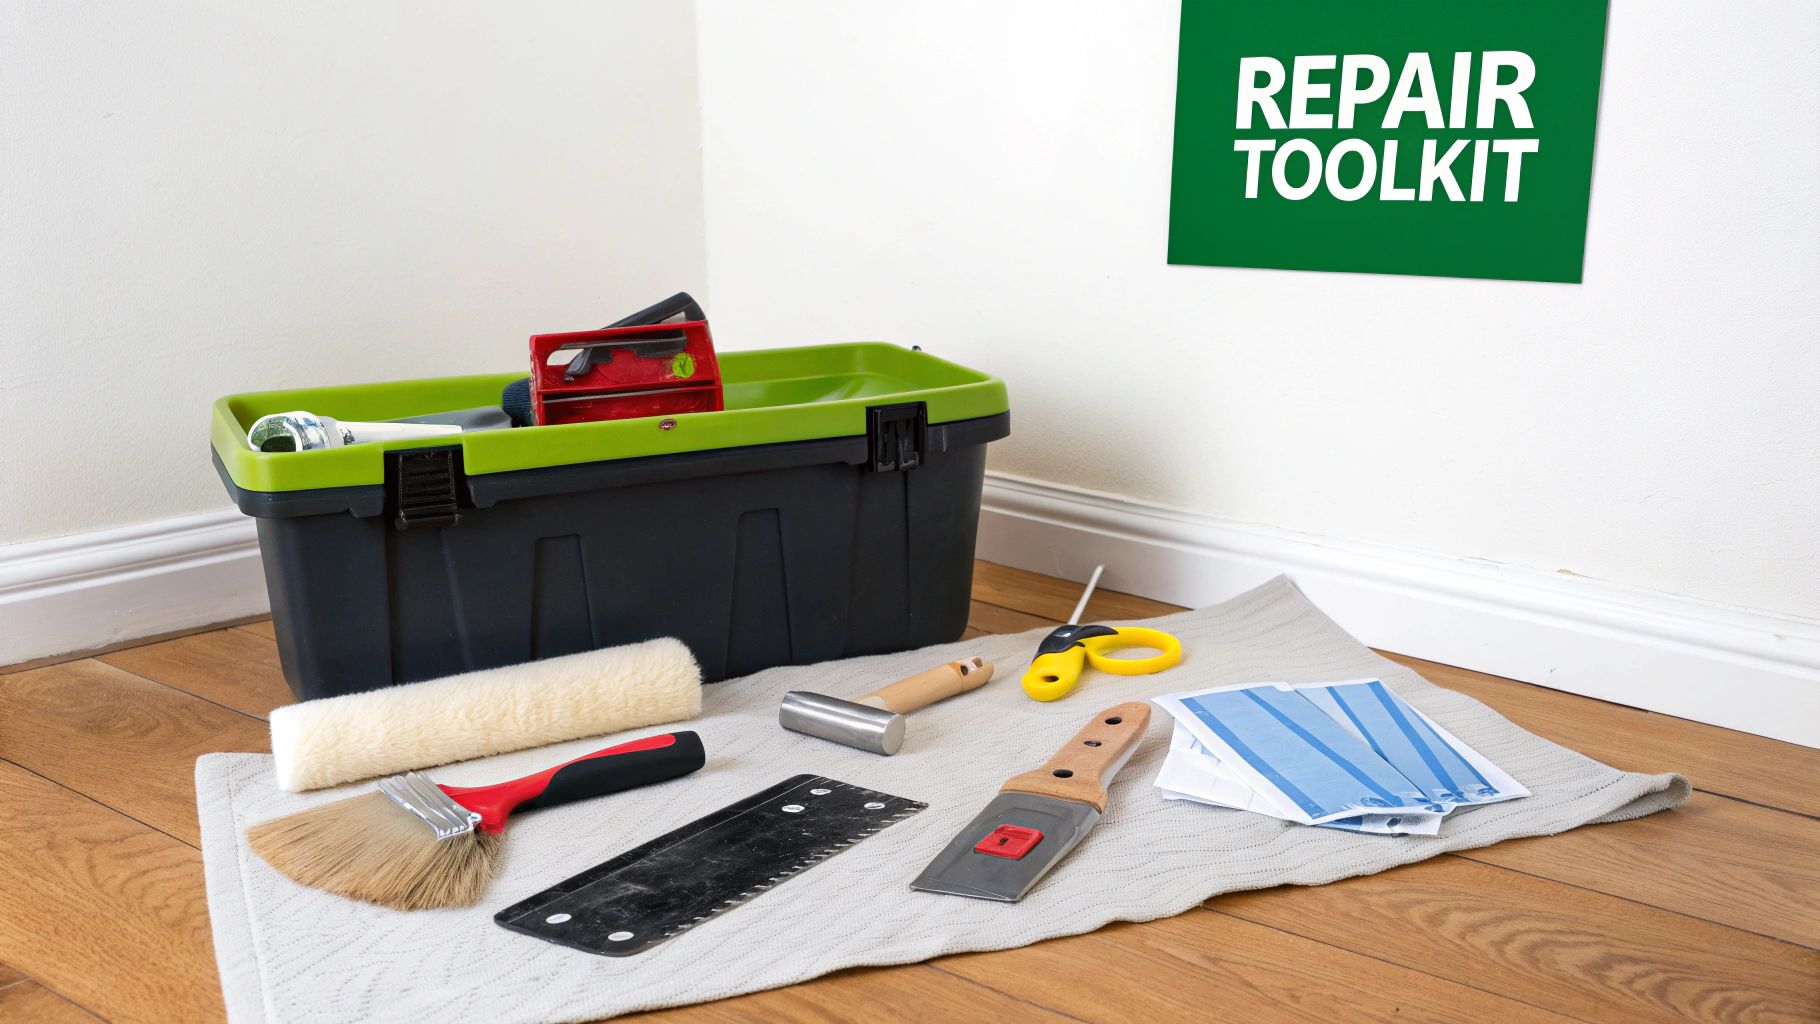
Before you start, lay everything out. Think of it as your mise en place for DIY. Getting your tools for preparation, filling, and finishing all in one spot makes the whole process faster and far less messy.
One of the first questions I get asked is whether to use pre-mixed or powdered filler. For tiny jobs like old picture hook holes, a small tub of pre-mixed filler is a lifesaver – just open and go. But for anything deeper, a powdered filler is your best bet. It dries harder, shrinks less, and gives you a much more robust repair.
Your Core Repair Kit
Every wall repair job, big or small, relies on a few key items. You absolutely need a decent putty knife or filling knife. I always keep two in my box: a flexible 1.5-inch one for delicate work and a stiffer, wider 4 to 6-inch blade for spreading compound over larger patches.
If the hole is bigger than a fifty-pence piece, you'll need some sort of reinforcement to stop the filler from just falling through. Self-adhesive fibreglass mesh patches are fantastic for holes up to a few inches across. For anything larger, you're going to need a small offcut of plasterboard to properly bridge the gap.
Here's a tip I learned the hard way: always keep a damp sponge or cloth nearby. Wiping excess filler off the wall and your tools before it sets will save you a world of sanding later on. Trust me.
Essential Materials for Hole Repair by Size
To make it even clearer, here’s a quick-reference table to help you grab exactly what you need from the shop based on the size of the damage.
| Hole Size | Primary Repair Material | Reinforcement Needed | Finishing Tools |
|---|---|---|---|
| Small (under 2 inches) | Pre-mixed or powdered filler | Self-adhesive mesh patch | Putty knife, sandpaper |
| Medium (2-6 inches) | Powdered filler/joint compound | Plasterboard offcut, mesh tape | Filling knife, screws, sandpaper |
| Large (over 6 inches) | Large plasterboard patch | Wooden battens, plasterboard screws | Taping knife, joint tape, hawk |
This table should help you avoid buying materials you don't need while ensuring your repair is built to last.
Sanding and Safety Gear
Getting a perfectly smooth, invisible finish is all down to the sanding. Don’t skimp here. You'll want a couple of different sandpaper grits. Start with something like a 120-grit to knock down any high spots on the dried filler, then switch to a fine 220-grit paper to get it silky smooth and ready for paint.
And please, don't forget your safety gear. Sanding filler creates a lot of fine dust that you don't want to be breathing in, so a simple dust mask is a must. A pair of safety glasses is also a smart move to protect your eyes. A successful repair is a safe one.
For a more comprehensive list of what every homeowner should have in their toolbox, take a look at our guide on the essential tools for homeowners.
How to Prepare Your Wall for a Seamless Repair

I've seen it a hundred times: a perfectly good repair that sticks out like a sore thumb simply because the prep work was rushed. The secret to a patch that genuinely disappears into the wall isn't the filler you use, but the groundwork you lay beforehand. It’s worth spending an extra ten minutes here to get it right.
First things first, have a proper look at what you’re dealing with. A tiny nail hole is a world away from a doorknob-sized crater. Whatever the damage, your goal is the same: create a clean, solid, and stable area for the filler or patch to grip onto. If you try to fill over a crumbly, weak edge, the repair will almost certainly crack and fail down the line.
Creating a Solid Foundation
Grab a utility knife or a sharp scraper and get to work on the edges of the hole. You need to clear away any loose bits of plasterboard, crumbling old plaster, or torn paper. Keep trimming until you get back to solid, undamaged wall material.
If you're working with plasterboard, pay close attention to the paper facing. You need to cut away any frayed or bubbling paper because filler won't stick to it properly—it needs to bond directly with the gypsum core. A messy edge is a surefire way to have the repair show through your final coat of paint.
Here’s a pro tip that makes a huge difference: once the edges are tidy, gently push them in with the handle of your putty knife. This creates a very slight indent, allowing your filler to sit flush or just below the wall surface. It's the best way to avoid that tell-tale bulge you often see with DIY repairs.
With the edges prepped, give the area a quick wipe with a damp cloth to get rid of any dust. You need a clean surface for the best possible adhesion, so don’t skip this part.
Containing the Mess
Before you even think about opening a tub of filler, take a moment to protect the room from the inevitable dust cloud. A few minutes of prep now will save you a massive clean-up job later.
It’s pretty simple, really:
- Lay Down Dust Sheets: Get a good quality dust sheet on the floor under where you're working. If there’s furniture nearby, cover that as well. Plaster dust gets everywhere.
- Use Masking Tape: If you're not confident with a filling knife, put some masking tape around the area. It gives you a clean edge to work to and protects the surrounding paint.
This little bit of setup keeps the mess contained, making the final tidy-up a breeze. Now, with a perfectly prepared surface, you're ready to get on with the actual repair.
Fixing Small to Medium Holes in Plasterboard
Let's be honest, small and medium-sized holes are the most common battle scars a wall accumulates. We're talking about the classic doorknob divot, the scuff from moving furniture, or that spot where a picture hook used to be. They’re annoying, but the good news is they are completely fixable for any DIYer with a bit of patience.
Getting these repairs to look completely invisible all comes down to using the right stuff and, more importantly, the right technique.
For anything from a stubborn screw hole up to a hole a couple of inches across, your secret weapon is a self-adhesive fibreglass mesh patch. These things are brilliant. You just stick one directly over the hole, and it instantly provides a strong, stable base for your filler. It’s the key to stopping the filler from just sagging or falling into the wall cavity, giving you a solid, lasting mend.
Applying Filler the Right Way
With your mesh patch stuck firmly to the wall, you're ready for the filler. A good quality, quick-drying filler is what you want here. We find a versatile product like Gyproc EasiFill 60 works a treat, as it gives you a decent amount of time to work with it before it starts to set.
Grab a flexible filling knife, scoop up a bit of filler, and spread it over the patch. The aim on the first pass isn't to fill the hole completely. Instead, focus on working a thin, even layer right over the patch, pressing firmly enough that the filler pushes through the mesh and grabs onto the plasterboard behind.
Here's a pro tip: The most common mistake is slapping on too much filler at once. You end up with a bulge that's a nightmare to sand flat. The real trick is to 'feather' the edges out. Use your knife to spread the filler thinly away from the centre, blending it seamlessly into the surrounding wall.
This takes a bit of a feel. Use light pressure and sweep your knife in different directions to create a smooth, tapered edge. Trust me, it’s always better to apply two or three thin coats than one thick, lumpy one.
Perfecting the Finish with Patience
After that first layer is on, you have to let it dry. Don't rush it. Drying times depend on the filler, the temperature of the room, and how damp the air is, so always have a quick read of the instructions on the packet. Trying to sand or re-coat wet filler will just make a mess and lead to a weak repair.
Once it’s properly cured, you’ll probably see some slight shrinkage or a few minor imperfections. That’s totally normal. Just apply another very thin layer, feathering the edges out again to build the surface up until it’s perfectly flat.
When the final layer is bone dry, it's time for the step that makes or breaks the repair: sanding. Get yourself some fine-grit sandpaper (something around 180-220 grit is ideal) and lightly sand the whole area. Use a delicate touch and a circular motion, really focusing on those feathered edges until you can run your hand over it and not feel any ridge at all.
This patient, layered approach is the foundation for almost all plasterboard repairs. The principles are the same even for the smallest fixes, like old nail or screw holes. For those, you can often get away without a mesh patch, but the careful application of filler and a light sand are still vital. It's well worth the effort to master drywall screw hole repair, as it’s a skill you’ll find yourself using again and again.
Tackling Large Holes and Damaged Plaster
Now we're moving beyond minor cosmetic fixes. We're talking about the kind of damage that can look properly intimidating—a hole punched right through the plasterboard or a big, crumbling section on an old lath and plaster wall. It looks bad, I know. But while these repairs definitely need more elbow grease, the process is surprisingly logical and well within the reach of a determined DIYer.
For a big hole in modern plasterboard, you can forget about just slapping on some filler. You need to build a new, solid section of wall. The best way to do this is to cut a neat, square patch of new plasterboard that's slightly bigger than the hole itself. You then hold this patch over the damaged area, draw around it, and carefully cut out the damage to match.
Doing it this way guarantees your new patch will slot in perfectly, which is the crucial first step to making the repair completely invisible once you're done.
Reinforcing Your Plasterboard Patch
The real secret to a strong, permanent repair isn't what you see on the surface; it's what's happening behind the wall. That new piece of plasterboard needs a solid anchor. This is where timber battens save the day.
Grab a couple of pieces of scrap timber (something around 2x1 inch is perfect) and cut them a few inches longer than the height of your hole. You'll then feed these battens into the wall cavity, one at a time, positioning them so they sit behind the existing plasterboard and span the gap.
Drive some plasterboard screws through the good wall and into the timber battens to lock them in place. What you've just done is create a sturdy framework inside the wall, giving you something solid to screw your new plasterboard patch onto.
My number one tip here is to sink your screws just a fraction below the surface of the plasterboard. This creates a tiny divot that the filler can cover later, giving you that perfectly flat finish. A screw head sticking out, even a little, is a nightmare to hide.
Dealing with Traditional Lath and Plaster
Older properties, with their traditional lath and plaster walls, throw a different kind of curveball. When this stuff fails, it doesn't just make a hole; it tends to crumble away from the wooden laths behind it. Fixing this is all about building the area back up in layers.
First, you have to get rid of all the loose, unstable plaster around the damage until you hit a solid edge. Once it's clean, you can start applying a bonding coat or a specific repair plaster straight onto the exposed laths. Really press it in there to make sure it gets a good grip.
This isn't a one-and-done job. It often takes two or three coats, gradually building the surface up until it's flush with the surrounding wall. It’s a slower, more patient process, but it's the right way to get a durable repair that honours the original construction of your home.
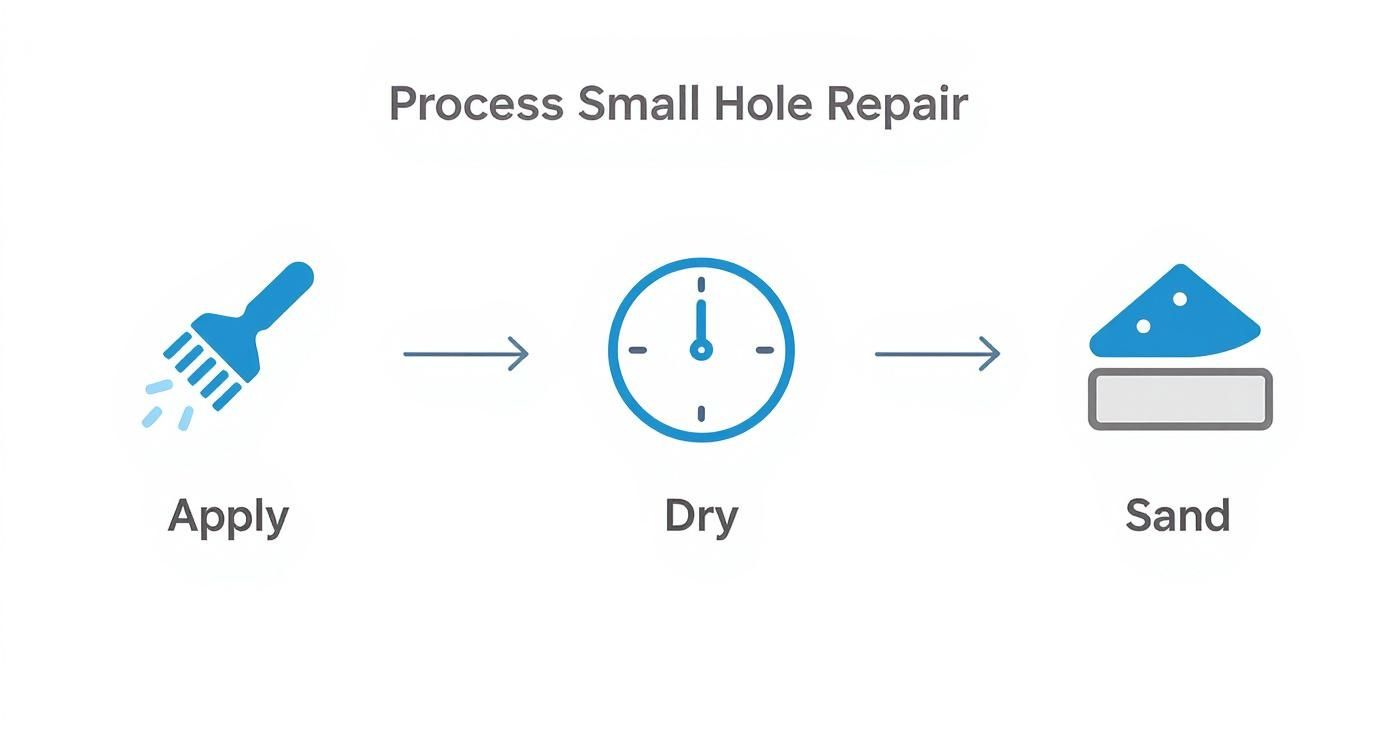
While the diagram above shows a simple three-stage process for a small job, the core principles—apply, dry, and sand—are exactly the same for any patch repair, no matter the size.
It's vital, however, to know the difference between common repairs and signs of a much bigger problem. Subsidence, for example, is a serious issue in the UK, particularly in areas with clay soil, and it can cause major cracks and holes. The cost to fix subsidence damage isn't trivial; the average repair is estimated at £12,500. Underpinning a single wall can run anywhere from £5,000 to £22,000, which shows why you need to get a professional in immediately if you suspect any structural movement. You can learn more about the costs of these structural repairs over on Checkatrade.
Achieving a Perfect Finish with Sanding and Painting
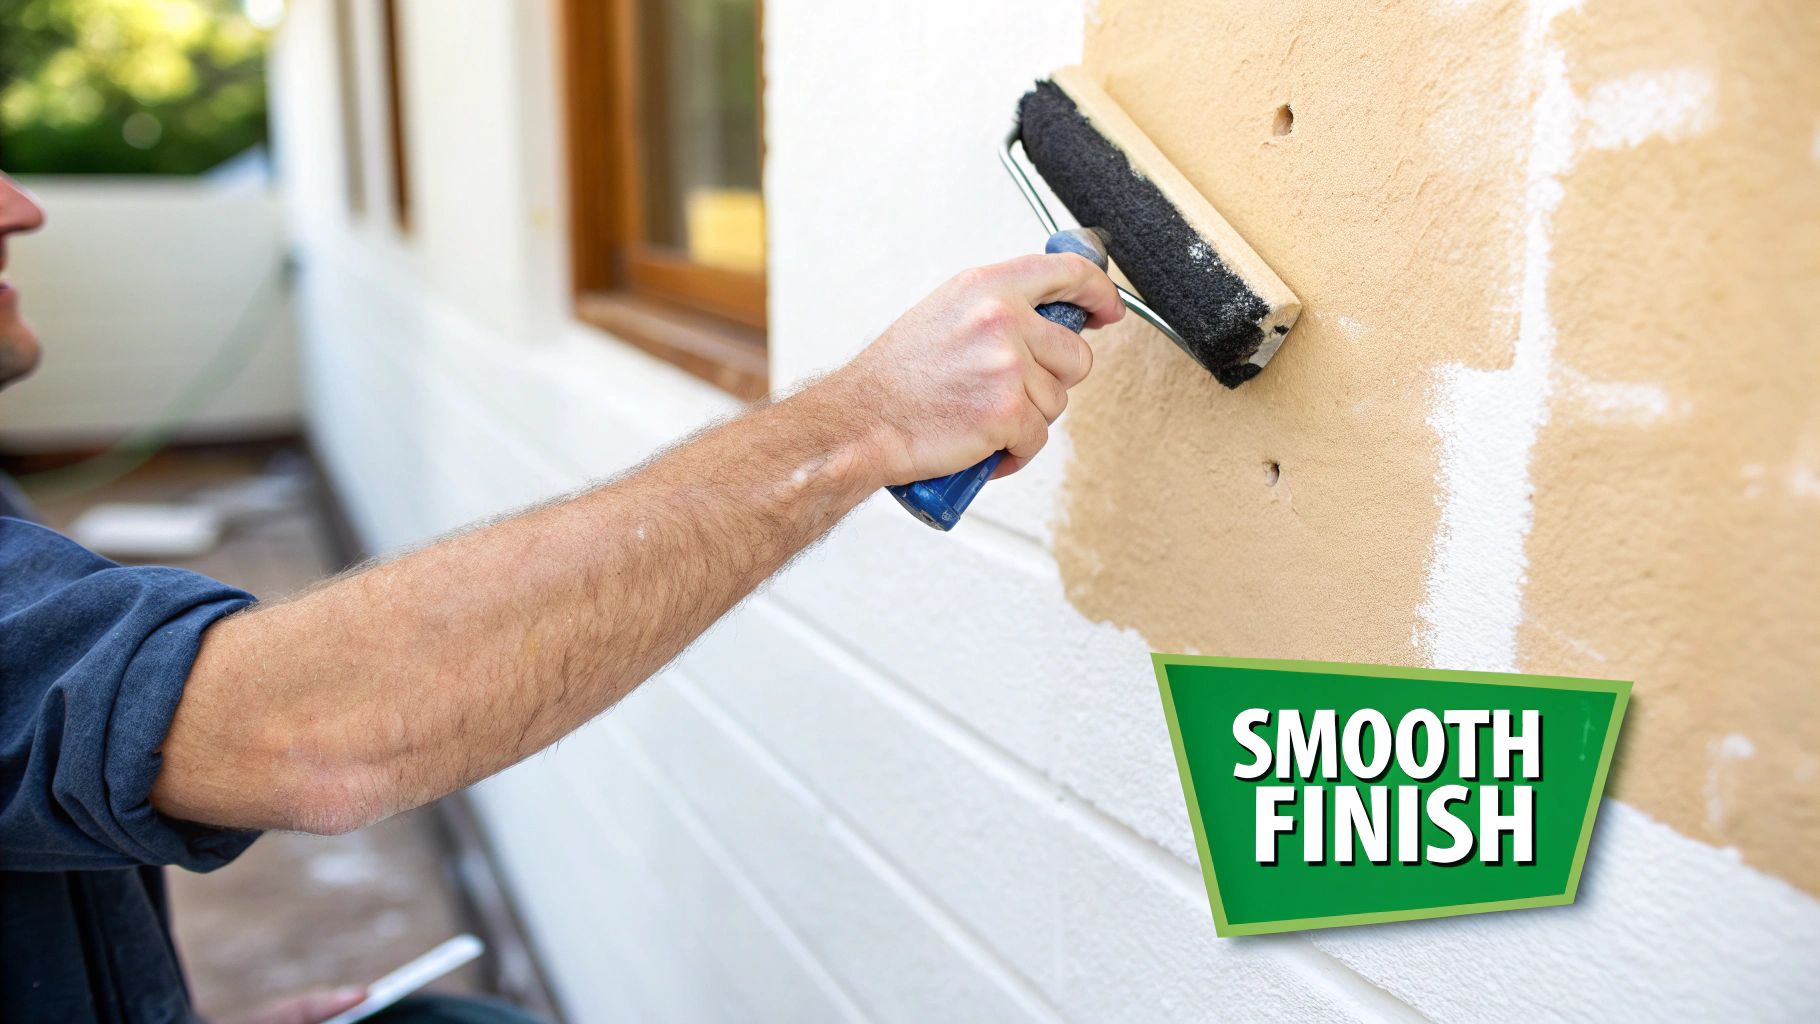
The last leg of the journey is where your repair goes from a noticeable patch to a completely invisible mend. This is where a little bit of patience makes all the difference. If you rush the sanding and painting, all that careful prep work can be for nothing.
Your main goal here is to sand the patch until it’s perfectly level and feels like it’s always been part of the wall. Grab some medium-grit sandpaper – something around 120-grit is a great starting point – to knock down any high spots or ridges on the dried filler.
Don't go at it too aggressively. A light, circular motion is all you need. Let the sandpaper do the work for you, as pressing too hard can easily create new grooves you’ll have to fill.
Final Sanding and Inspection
With the main bumps levelled out, it's time to switch to a finer grit. A 220-grit paper is ideal for the final pass. This step buffs out any tiny scratches left by the coarser paper and feathers the edges of your repair beautifully into the surrounding wall.
Now, before reaching for the paint, give your work a proper inspection. And for this, your hands are often a better tool than your eyes.
Close your eyes and run your palm over the entire patch and the area around it. You’ll be amazed at what you can feel – tiny imperfections that are practically invisible. If you find any, a quick, light touch-up with the fine-grit paper will sort them out.
Once you’re happy with the feel, wipe the whole area down with a slightly damp cloth. You want to remove every last speck of sanding dust, as it’s the number one enemy of a smooth paint finish.
The Crucial Role of Primer
Honestly, skipping the primer is one of the most common DIY mistakes I see. It's the secret ingredient to making a patch truly disappear. Why? Because filler and plaster are much more porous than your painted wall, meaning they soak up paint like a sponge.
A quick coat of primer solves two big problems:
- It seals the porous filler, making sure your topcoat of paint dries evenly across the entire surface.
- It provides a uniform base, ensuring the colour and sheen of your paint will match the rest of the wall perfectly.
If you don't prime, the repaired spot will likely look dull or flat once the paint dries. This effect is called 'flashing', and it's a dead giveaway that a repair has been done.
Painting for an Invisible Blend
Once the primer is completely dry, you’re ready for the paint. Using a small roller or a good-quality brush, apply your paint starting at the centre of the patch and working your way outwards. As you get to the edges, feather the new paint into the old to create a seamless transition.
You'll almost certainly need at least two coats to get a perfect blend. Be prepared for that. If you're matching a wall with a bit of a sheen, like a silk or eggshell finish, blending becomes even more important. For advice on tackling those trickier surfaces, our guide on can you paint over gloss has some extra tips.
Let it all dry thoroughly, step back, and admire your handiwork. The hole is gone, and your wall looks as good as new.
Knowing When to Call a Professional
While tackling a hole in the wall yourself can be incredibly satisfying, some situations are less about DIY pride and more about spotting potential dangers or underlying problems. Knowing when to put down the tools and pick up the phone is a crucial skill for any homeowner.
Sometimes, a hole isn't just a hole. It can be a symptom of a much bigger issue that a bit of filler and paint simply can't fix. It’s vital to recognise these red flags before you start what seems like a simple patching job.
Spotting the Warning Signs
Certain signs should immediately make you pause and consider getting an expert in. These are clear indicators that the damage might be more than just cosmetic.
Keep a sharp eye out for these tell-tale signs:
- Persistent Damp or Mould: If the area around the hole feels damp, is discoloured, or you can see mould, you’ve almost certainly got a leak inside the wall. Patching this without fixing the source will only trap moisture and create a much bigger, more expensive problem down the line.
- Large, Jagged Cracks: See cracks spreading out from the hole, especially if they look like a spiderweb or run diagonally? This could suggest structural movement. That's definitely a job for a professional to assess.
- Spreading Damage: If you notice the damaged area seems to be growing, crumbling, or feels soft and spongy, it points to an ongoing issue that needs a proper diagnosis, not a quick cover-up.
Trust your instincts. If a repair feels too complex or you uncover something unexpected—like crumbling brickwork or signs of pests behind the plasterboard—it's always smarter and safer to get a professional opinion.
When Safety Comes First
Beyond structural concerns, some repairs carry genuine safety risks. These are best left to qualified tradespeople. Never, ever attempt a repair if it's near electrical wiring or plumbing.
The risk of drilling into a live wire or a water pipe is very real and can have severe consequences. If your hole is anywhere near sockets, light switches, or in a wall you know contains pipes (like in a kitchen or bathroom), calling an electrician or plumber first is non-negotiable. For more complex issues or to understand general costs, you can also consult a comprehensive guide to home repair costs and finding trusted trades.
Understanding Professional Costs
Making an informed decision often comes down to the cost. In the UK, the price for a professional hole repair can vary quite a bit.
You might pay anywhere from £50 to £150 for a basic fix on a small hole. However, larger, more complex jobs can easily run into several hundred pounds. Generally, you can expect a plasterer's hourly rate to be around £80 to £120. Keep in mind that prices in London and other big cities are often 15-25% higher than in more rural areas.
Knowing these figures helps you weigh the cost of hiring a pro against the time and materials for a DIY attempt, ensuring you make the best choice for your home and your budget.
Whether you're tackling a small ding or a major repair, having the right materials is key. For a complete range of plasterboard, fillers, and finishing supplies, visit Burnt Oak Builders Merchants. Find everything you need for a flawless finish at https://www.burntoaktimber.com.